How to Fix 3D Print Warping: Causes, Solutions & Prevention
Struggling with warping issues in 3D printing? Learn what causes 3D print warping and how to fix it with our step-by-step guide for PLA, ABS & PETG.
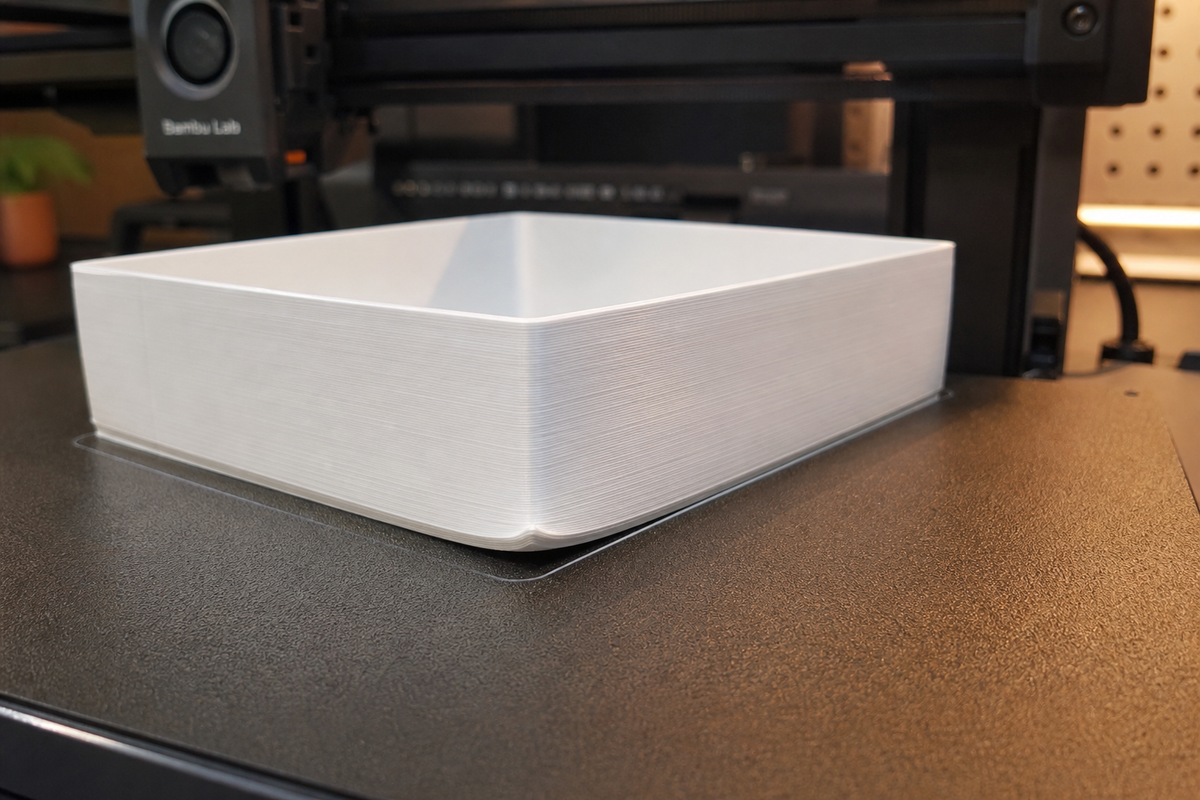
It can be frustrating to see the corners of your print curling up off the bed, but don’t worry. Actually, this is one of the most frequent warping problems in 3D printing, and it is easily fixable. Most of the time it’s just one thing: your plastic cooling unevenly. Some parts shrink faster than others, and the tension from that pulls the edges right off the bed.
In this guide, we’ll go over every cause of 3D print warping along with its fix , so you know exactly what's going on and what to do about it.
How to Tell If Your 3D Print Is Warping
Before changing any settings, let's make sure you are actually dealing with warping and not something else. Here’s what to watch for:
- Lifted corners: The corners of the print are lifting off the bed. This is the most classic sign.
- Curled edges: The bottom edges of the print curl upwards so the base is not flat.
- Gaps under the print: You can see light between the bed and the print's edge, or feel a gap with your fingernail at the corners.
- Cracking between layers: In extreme cases, the internal stress can cause visible splits between layers, especially on tall prints.
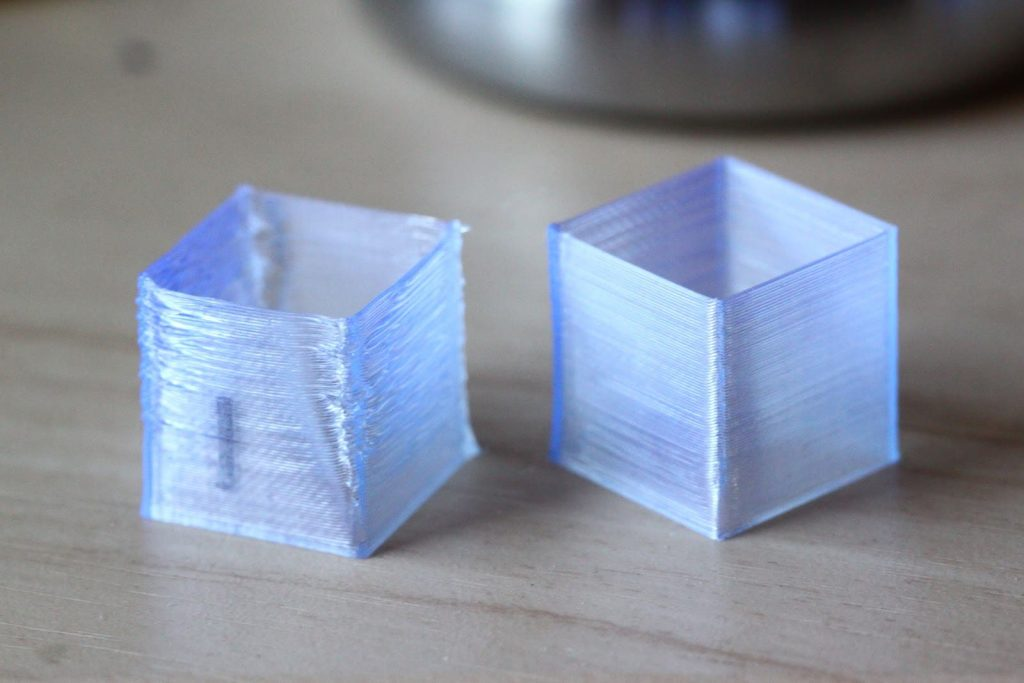
Still not sure? Here’s a quick way to tell it apart from some other common problems:
| Symptom | Likely Problem |
|---|---|
| Corners lift during printing | Warping |
| The entire first layer won't stick at all | Bed adhesion failure |
| The first layer is squished and wider than designed | Elephant foot (nozzle too close to bed) |
| Layer splits/cracks on tall prints | Warping (extreme) |
What Causes 3D Printing Warping Issues and How to Fix It
Warping doesn’t just happen randomly; there is always a specific reason behind it. Let’s go through all of the causes so you know what is happening to your print.
Temperature & Cooling
Why it causes 3D printing warping issues:
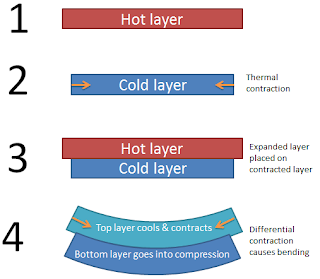
- Plastic expands on heating and shrinks on cooling. As your printer prints a layer, that layer begins to cool down and shrink immediately. If the bottom layers cool and shrink, but the top layers are still warm, the difference in shrinkage causes internal stress that pulls the corners upward.
- This is worsened by drafts and temperature fluctuations. One side of the print cools faster than the other, causing uneven stress.
- For comparison, ABS contracts by about 1.5% from printing temperature to room temperature. That's 3mm shrinkage on a 200mm part. That's more than enough to rip the corners right off the bed.
Here’s how to fix it:
- Use a heated bed: It keeps the bottom layers warm so they don't shrink while the print is still building. Set it to the recommended temperature for your material (see the material section below)
- Enclose it: The enclosure traps heat around the entire print, not just the bottom. It is required for ABS and ASA and optional for large PLA prints.
- Turn off the cooling fan for the first 2–4 layers: Most slicers have a "disable fan for initial layers" setting. This lets the first layer bond to the bed before they start contracting.
- Control your environment: Keep the printer away from open windows, air conditioning vents, and doorways. Even a gentle breeze can cause one side to cool faster than the other.
Bed Adhesion
Why it causes 3D printing warping issues:
- Think of it as a tug of war. On one side, you have the shrinking force of the cooling plastic pulling the print up. On the other side, you have the adhesion force holding the print down to the bed. If you lose adhesion, the corners lift up.
- Dirty bed surface: fingerprints, dust, and old filament residue seriously reduce adhesion. If the bed isn’t level, some areas will hold well and some won’t. The weak spots are always the places where the warping begins first.
Here’s how to fix it:
- Level your bed properly: If your printer has auto-bed leveling, use it. For manual leveling, slide a piece of paper between the nozzle and bed at each corner, and adjust until you feel slight drag at each point. See our full step-by-step calibration walkthrough if you've never done this before.
- Clean the bed before every print: Use isopropyl alcohol (IPA) and a lint-free cloth to remove fingerprints and residue.
- Use adhesion aids:
- Glue stick (PVA-based): Thin layer on the bed, cheap, and works well for PLA and PETG
- Painter's tape: Good for PLA, lay down smooth strips without air bubbles
- Hairspray: Light coat on glass beds for a tacky surface.
- PEI sheet: When heated, excellent adhesion to PLA, PETG, and ABS
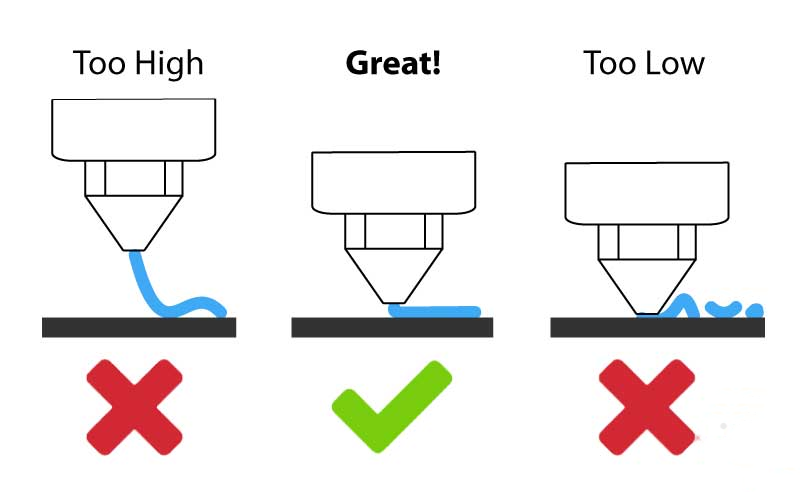
- Set the right nozzle height for the first layer: If the nozzle is too far from the bed, the filament won’t squish into the surface. The first layer should be a bit flattened, not round.
Print Settings
Why it causes 3D printing warping issues:
- The first layer is your foundation, and your slicer settings determine how strong that foundation will be. If you print the first layer too fast, the filament doesn't have enough time to bond with the bed before the print head moves on, and those weak spots are exactly where warping starts.
- Printing without a brim on parts with a small base also means there is less surface holding the print down, giving the shrinkage force an easy win.
- And dense infill actively makes it worse. More material inside the part means more total shrinkage, which multiplies the internal stress pulling on the base.
Here’s how to fix it:
- Add a brim: It extends the first layer outward around the part, increasing the contact area with the bed. It can be peeled off easily after printing. Use 5-10 brim lines for warping-prone parts.
- Use a raft for tricky geometry: It prints a thick flat platform under your part. A little more aggressive than a brim, but great for parts with very little bed contact.
- Slow down the first layer: Try setting the first layer speed to 50-70% of your normal print speed, so there’s more time for the filament to bond.
- Increase first layer width and height: A wider, thicker first layer (e.g., 0.3 mm height instead of 0.2 mm) will give you a sturdier foundation with more surface contact.
- Reduce infill density if possible: 15–20% instead of 50%+ means less material contracting inside the part, reducing internal stress.
Part Design
Why it causes 3D printing warping issues:
- Stress concentrates in sharp corners. This is why corners are always lifted first. When each layer contracts, the forces from two perpendicular edges add up right at the corner.
- Parts that flare out as they go up are also naturally prone to warping, because each new layer adds more material that wants to shrink, multiplying the force on everything below it.
Here’s how to fix it:
- Add fillets to sharp corners: If you designed the model yourself or can edit it, add rounded edges to the corners that contact the bed. A small fillet of 2-3 mm evenly spreads the stress rather than concentrating it at one point and makes a big difference.
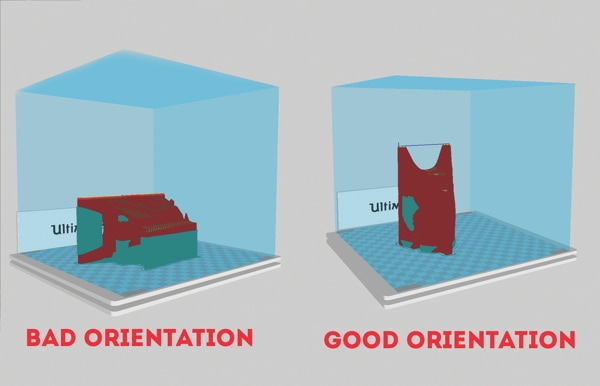
- Place the largest face downwards: When placing your model in the slicer, turn it so that the biggest flat side is on the bed. More surface area means more adhesion. If the cross-section gets smaller as the print goes up, each new layer adds less stress, not more.
PLA vs ABS vs PETG: Material-Specific Warping Fixes
Not all filaments deform the same way. PLA, ABS, and PETG all cool differently, so the fixes that work for one material aren't going to be the same for another. Here’s what you need to know about each material:
How to Prevent PLA 3D Print Warping
Among the three, PLA is the simplest to work with. As it cools, it shrinks very little, making it the least likely to warp. If you're just starting out, you're already using the most forgiving material out there.
- Suggested settings: Nozzle 200-220°C, heated bed 50-60°C
- Heated bed: For PLA, a heated bed at 50–60°C is normally enough to keep warping away. But don't go over 60°C, as PLA has a glass transition temperature of around 60°C, and the bottom layers will start to soften and deform
- Brim: Not always needed, but can be useful on anything with a large flat base (200mm+)
- Enclosure: Not needed for PLA. PLA actually benefits from active cooling after the first 2-3 layers, so leave the fan on
- Environment: Keep it away from drafts, and you'll rarely see warping issues with PLA
How to Prevent ABS 3D Print Warping
ABS is another animal altogether. This is the most warp-prone common filament you will find, and for good reason: it shrinks about 1.5% from printing temperature to room temperature. That's a lot more than PLA, and that shrinkage will cause serious warping issues in 3D printing on anything larger than a small part if you aren't set up properly.
- Recommended settings: Nozzle 220–250°C, heated bed 95–110°C
- Enclosure: This is not optional for ABS. Without one, drafts and room temperature swings will warp almost anything larger than a small part. Let the enclosed printer sit with the heated bed on for 10–15 minutes before printing, so the trapped air warms up and stabilizes.
- Cooling fan: Turn it all the way off, or run it at a very slow speed
- Brim: Use on every ABS print. No exceptions
- Bed surface: A PEI sheet with the bed at 95-110°C works great for ABS. Wipe with IPA before every print
How to Prevent PETG 3D Print Warping
PETG is right in the middle: not as easy as PLA but not nearly as demanding as ABS. It has a low-to-medium warping tendency, and if your setup is reasonably dialed in, you won't have much trouble with most prints.
- Recommended settings: Nozzle 220–250°C, heated bed 70–85°C
- Enclosure: Useful, but not absolutely necessary for PETG
- Fan: Run at low speed
- Brim: Should be added to larger prints
- Glass transition temperature: ~80°C
Here's a quick summary of how all three materials compare:
| Material | Warping Risk | Bed Temp | Enclosure? | Fan |
|---|---|---|---|---|
| PLA | Low | 50–60°C | Not needed | On (after first 2–3 layers) |
| PETG | Low–Medium | 70–85°C | Helps, not required | Low speed |
| ABS | High | 95–110°C | Required | Off or very low |
See our FDM 3D printing guide for a full material comparison.
Quick Decision Guide: Which Fix Do You Need?
| Symptom | Most Likely Cause | Try This First |
|---|---|---|
| Corners lift on ALL prints | Bed temp too low / no enclosure | Raise bed temp 5°C; add enclosure for ABS |
| Corners lift on LARGE prints only | Insufficient adhesion area | Add 8-10 line brim |
| One corner lifts, others fine | Bed not level / draft from one side | Re-level; check for air vents nearby |
| Warping starts mid-print (not first layer) | Cooling too aggressive / infill stress | Reduce fan speed; lower infill to 15-20% |
| Only ABS/ASA warps; PLA is fine | No enclosure | Add enclosure (required for ABS) |
FAQ on 3D Printing Warping Issues
How to get rid of warping in 3D printing?
The best combination is a properly leveled and clean heated bed, a brim or raft added in your slicer, and a stable environment with no drafts. For ABS, add an enclosure. In most cases, a heated bed at 50-60°C and a brim will solve the problem for PLA. If you are still stuck, see the causes section above; there is always a specific reason for it.
Is PLA or PETG more prone to warping?
Due to the higher printing temperature and higher thermal contraction, PETG is more likely to warp than PLA. However, the risk of warping for both materials is relatively low compared to ABS. If you are a beginner, PLA is the easiest material to print without warping.
Does gyroid infill help with warping?
It might help a little. The gyroid infill provides a more even distribution of internal stresses than rectilinear or grid patterns, and this may reduce edge warping. But that’s a secondary factor at best; bed adhesion, temperature control, and your environment have a much larger impact. Switching to gyroid infill will not solve a warping problem, but it can be part of the solution, along with other fixes.
Can you fix a warped print after it's finished?
Sometimes. Minor warping can be corrected by applying gentle heat to the warped area with a heat gun or by placing it in hot water, then pressing it flat and holding it until it cools. This works best with PLA. However, severe warping is generally permanent and it is better to fix the underlying cause and reprint than to try to rescue it.
What causes warping in 3D printing?
Warping is caused by uneven cooling. Once printed, the plastic cools and shrinks. Different parts of the print cool and contract at different rates, creating internal stress that pulls the edges or corners up off the bed. The main reasons are temperature settings too low, poor bed adhesion, slicer settings that ignore the material, and environmental factors like drafts or an unstable room temperature.
Comments ()