3D Printer Ironing: Setup Guide & Best Settings for Beginners
3D printer ironing smooths the top surface of your print by re-melting the plastic with a second nozzle pass. This guide covers what ironing does, when to use it, the best settings for PLA, PETG, and ABS, and how to enable it in Bambu Studio, PrusaSlicer, and Cura.
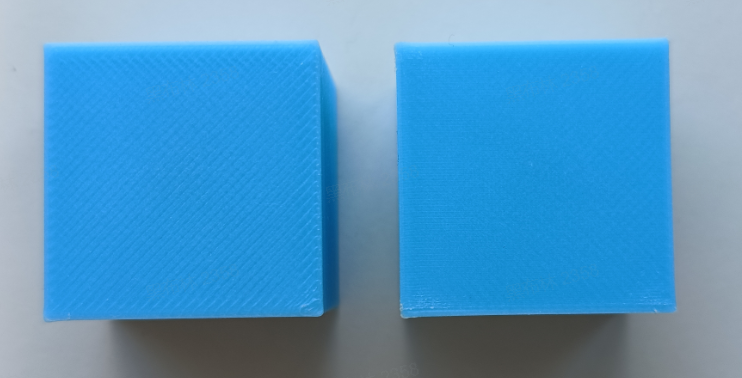
To get a 3D print you need to think about how it will look when it is done. Even if the print is perfect it can still look a little rough because of the lines on the top. There is a way to make your prints look nicer without spending a lot of time sanding them. You can use the 3D printer ironing to make the top of your print smooth. The printer will make a pass over the top of the print with a hot nozzle to melt the plastic and make it smooth. This way the lines on the top will be much less visible, and the surface will have a slight sheen to it.
The 3D printer ironing can make a lot of prints look much better. It is not always a good idea to use it. You need to know when to use it and how to set it up to get the best results. In this guide you will learn what 3D printer ironing is, when to use it and how to set it up.
What Is 3D Printer Ironing?
If you are wondering what ironing does in 3D printing, it is a feature that most slicing software (also called slicers) have, like Cura, OrcaSlicer, Bambu Studio and PrusaSlicer. When you turn it on the printer will make a pass over the top of the print. The nozzle will be hot, it will put out a little bit of plastic. It will then smooth out the top of the print by melting the plastic. It doesn't print a full new layer; it just uses a tiny amount of plastic to fill gaps while melting the surface smooth.
Ironing is great for things like:
- Nameplates and signs
- Display models
- Trophy bases
- Product prototypes
- Storage boxes
- Tool organizers
- Flat-topped enclosures or project cases
It only works on the flat parts of the print, not on the sides or rounded parts.
When to Use 3D Printer Ironing
You should use the 3D printer ironing when you want your print to look nice. If you are making something to display or a gift you might want to use it. It can also be helpful if you are going to paint the print because the top will be smooth and you will not have to sand it much. Ironing is best for:
- Decorative prints or gifts
- Awards and plaques
- Product mockups
- Phone stands
- Display models
- Personalized signs
But you should not use it for:
- Mechanical parts
- Internal components
- Draft prints
- Things with curved tops
- Time-sensitive prints where speed is the priority
Does 3D Printer Ironing Make Prints Stronger?
The 3D printer ironing does not make the print much stronger. It only smooths the top surface by re-melting the plastic. It does not improve layer adhesion or structural strength. If you want stronger prints, then look at settings, especially like how thick the walls are, infill density and nozzle temperature.
Best 3D Printer Ironing Settings
The settings for ironing will depend on your printer and the plastic you are using. Here are some guidelines to help you achieve the best results.
Quick Start Settings
| Setting | Recommendation |
|---|---|
| Ironing | Enabled |
| Iron only highest layer | Optional (enable to save time) |
| Top solid layers | 5-7 |
| Ironing flow | 10-15% |
| Ironing speed | 15-25 mm/s |
| Ironing line spacing | 0.10-0.20 mm |
| Ironing pattern | Rectilinear (called Zigzag in Cura) |
| Nozzle temperature | Normal printing temperature |
The ironing flow setting controls how much plastic comes out during the ironing pass. If it is too little the top will not be smooth. If it is too much the top will be blobby. For PLA plastic 10-15% is a starting point. For PETG, use a lower flow of 8-12% to avoid blobs.
The ironing speed setting controls how fast the printer moves during the ironing pass. 15-25 mm/s is a range for most printers. If you go slower, the nozzle stays on the surface longer, which makes it smoother. But it also takes longer to print.
The ironing line spacing setting controls how far apart the ironing lines are. If you make it smaller the top will be smoother. 0.1-0.2 mm is a range to start with.
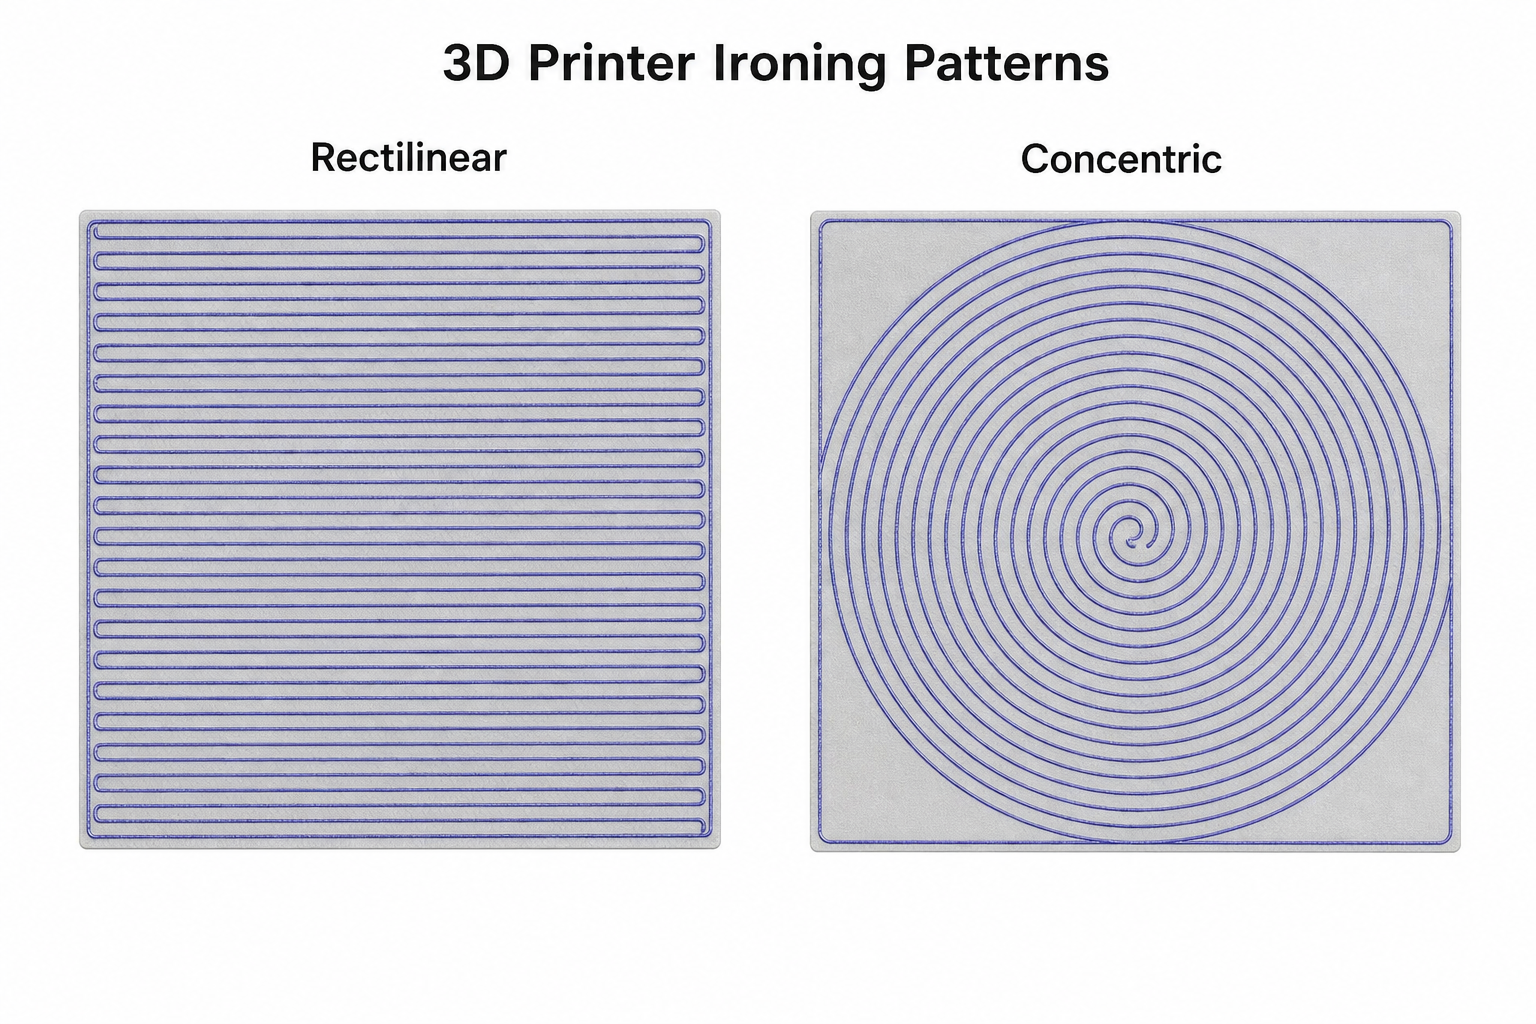
The ironing pattern setting controls how the printer moves during the ironing pass. The Rectilinear pattern (called Zigzag in Cura) is the one to start with because it is a good balance between speed and quality.
Rectilinear vs Concentric. Rectilinear moves the nozzle back and forth in straight parallel lines and works well for rectangular or square tops. Concentric follows the shape's outline and spirals inward, which produces a cleaner result on round objects like coasters, jar lids, or cylindrical caps. On circular surfaces, rectilinear can leave small ridges where the nozzle reverses direction at the perimeter. If your print has a round top, try switching to concentric.
Recommended Settings by Plastic
| Material | Flow | Speed | Notes |
|---|---|---|---|
| PLA | 10-15% | 15-25 mm/s | Best overall results |
| PETG | 8-12% | 15-20 mm/s | Reduce flow to avoid blobs |
| ABS | 8-12% | 20-25 mm/s | Print in an enclosed space |
| ASA | 8-12% | 20-25 mm/s | Same as for ABS |
| TPU | Not recommended. Flexible plastic does not work well with ironing | ||
How to Turn on 3D Printer Ironing
The ironing setting exists in every major slicer, but each one puts it in a different place.
How to Turn on Ironing in Bambu Studio & Orca Slicer
Orca Slicer is a fork of Bambu Studio, so the settings are in the same place.
- Open Quality settings in the left panel
- Scroll down to the Ironing section
- Set Ironing type to "Topmost surface only" or "All solid layer"
- Adjust flow, speed, and line spacing
Official docs: Bambu Studio official ironing documentation & Orca Slicer Wiki (GitHub)
How to Turn on Ironing in PrusaSlicer
Ironing is visible in Advanced or Expert Mode
- Switch to Expert Mode (top-right dropdown)
- Go to Print Settings → Infill
- Scroll to the bottom to find the Ironing section
- Enable ironing and configure settings
Official docs: Prusa official ironing documentation
How to Turn on Ironing in Cura
- In the Print Settings panel, search "ironing" or go to Top/Bottom
- Check Enable Ironing
- Set pattern, line spacing, flow, and speed
If you are chasing the ultimate cura ironing surface, you can also check the "Ironing Only Highest Layer" option to save time while keeping the very top perfectly smooth.
How to Fix Common 3D Printer Ironing Issues
| Problem | Cause | Fix |
|---|---|---|
| Visible lines or ridges | Flow too low | Increase ironing flow to 15%. If still visible, try 18%. |
| Bumpy / bubbly surface | Flow too high (over-extrusion) | Reduce flow to 8-10%. Check if line spacing is too small. |
| Plastic buildup at edges | Nozzle irons too close to the edge | Increase ironing inset to 0.4-0.5 mm. |
| Smears or shiny streaks | Nozzle temperature too high | Lower nozzle temperature by 5°C or increase speed. |
| Ironing takes forever | Speed too low or spacing too fine | Enable "Iron only highest layer" or increase line spacing to 0.2 mm. |
| Looks bad on curved tops | Ironing is for flat tops only | Switch to concentric pattern, or disable ironing entirely. |
Frequently Asked Questions
Is ironing worth it for 3D printing?
Yes, absolutely, as long as your print has flat top surfaces. While it adds roughly 5 to 20 percent to your total print time, it produces a visibly smoother, near-glossy finish with zero extra cost or manual effort. If the top surface of your print is visible and appearance matters, ironing is almost always worth enabling.
What are the best ironing settings for PLA?
Start with a Rectilinear pattern, 15 mm/s speed, 10 to 15% flow, 0.1 mm line spacing, and a 0.3 mm inset. These baseline settings work on most PLA prints right out of the box. If the surface isn't smooth enough, bump the flow up by 2 or 3 percent. If it looks bumpy, decrease the flow.
Should I iron every layer or just the top?
You should only iron the top layers in almost all cases. Ironing every single layer dramatically increases your print time (often doubling or tripling it) with absolutely no visible benefit on the internal structure or side walls. The only exception is if your print has visible horizontal "shelf" surfaces at multiple different heights; in that case, enable "iron all top surfaces" so every upward-facing flat area gets smoothed.
Comments ()