3D Print Brim: Best Settings & How to Add One in Your Slicer
Most prints don't warp because of bad filament. They warp because of a missing single-layer ring that takes 10 seconds to enable in your slicer.
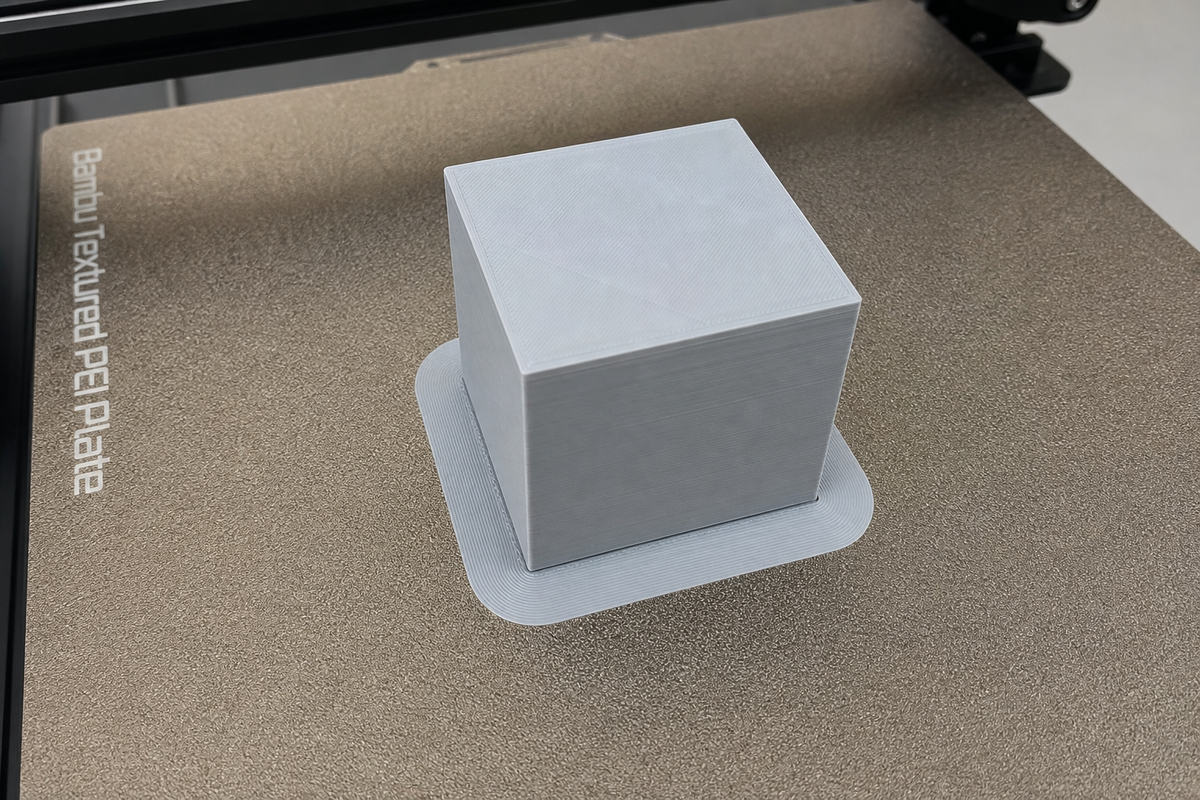
A 3D print brim is a single-layer flat extension printed around the base of your model to improve bed adhesion and prevent warping. If your prints are curling up at the corners or detaching from the bed mid-print, a brim is one of the easiest fixes you can make. This guide covers what a brim is, when you need one, the best settings for different materials, and step-by-step slicer setup.
What Is a Brim in 3D Printing?
Well, a brim is a thin extension printed around the bottom edges of a model within the first layer. To be precise, a 3D printing brim increases the contact area between the model and the plate. Thus, it lowers the chances of warping.
The best part is that, if you're opting for FDM 3D printing, a brim is the go-to adhesion tool for most FDM prints as it adds grip without the extra material and cleanup a raft requires.
Outer vs Inner Brim in 3D Printing
When understanding a 3D print brim, one should also know about its multiple options.
- Outer brim only: Here the brim extends outward to form a ring outside the object.
- Inner brim only: This option fills the inner holes. By catering to internal openings, the brim prevents the model from losing its shape.
- Outer and inner: Some slicers also allow users to generate both outer and inner brims.
- Auto brim: Here the system itself makes a judgment based on the model and generates an appropriate brim width. We always recommend beginners pick this option instead of contemplating between outer vs. inner brim 3D print options.
- Painted brim/brim ears: Lastly, there are brim ears, only applied to sections you choose.
When to Use a 3D Printing Brim (and When to Skip It)
While a 3D printing brim can reduce warping, it's not always needed.
Therefore, one must carefully analyze the situation and then decide on using 3D print brims. Use them when:
- The base of the model is too small.
- The model is tall with a small base, so there isn't enough contact area to keep it anchored to the bed.
- The filaments tend to warp, like ABS and Nylon.
- You are using a glass bed without any adhesion aid.
If your model already has a large base, or the bottom part has fine detailing, a brim won't be needed.
The need for a brim also depends on the material. If you're using PLA, keep in mind that it has low warping tendency, so it will stick easily to the base sheet. Thus, it greatly depends on the situation.
3D Printer Brim Settings Explained
Moving to the 3D printer brim settings, one should be aware that your printer’s settings decide how effective the brim will be.
The following table suggests which 3D print brim settings to maintain.
| Parameter | What it controls | Recommended value |
|---|---|---|
| Brim Width / Line Count | How far the brim extends from the model edge | 5-8mm for PLA; 10-15mm for ABS/Nylon |
| Brim-Object Gap | Space between brim and model (affects removal ease) | 0.1-0.2mm for easy removal; 0mm for max adhesion |
| Brim Type | Outer / Inner / Both / Auto | Outer only (default) |
From the brim width in 3D printing to the brim-object gap, all parameters have equal weight.
Key Tip: If you set the brim gap to 0 but still see a gap in the preview, check whether Elephant Foot Compensation is enabled in your slicer. That feature automatically shrinks the first layer inward, which creates an unintended gap between the brim and the model. Disable it if you want the brim fully attached.
Material-Specific Brim Settings
These parameters can also be adjusted for different filaments.
| Material | Brim Width | Bed Temp | Gap | Notes |
|---|---|---|---|---|
| PLA | 5mm | 60°C | 0.1mm | Rarely needed; use for small bases only |
| ABS | 10-15mm | 100°C | 0mm | Always use with enclosure |
| PETG | 8mm | 80°C | 0.15mm | Gap helps prevent brim fusing too hard |
| Nylon | 10-15mm | 70-80°C | 0mm | Add glue stick on smooth PEI |
| TPU | 3-5mm | 50°C | 0.2mm | Flexible = hard to remove if the gap is 0 |
How to Add a Brim to Your 3D Print
By now you must have developed a sound understanding of how to adjust these brim settings to get the best print. So, now it’s time to find the answer to “how do I add a brim to my 3D print”?
How to Turn on Brim in Bambu Studio & Orca Slicer?
The first items on the list are Bambu Studio and Orca Slicer. If you learn how to turn on a brim in Bambu Studio, you can follow the same steps for similar options.
- Open your model in Bambu Studio (or Orca Slicer — same interface).
- In the left sidebar, scroll down to the Others section.
- Find Brim type and select Auto (recommended for beginners) or Manual.
- If Manual: set Brim width (e.g. 8mm) and Brim-object gap (e.g. 0.1mm).
- Slice and check Layer 1 in the preview to confirm the brim appears around the model.
Official docs: https://wiki.bambulab.com/en/software/bambu-studio/auto-brim
How to Add a Brim in PrusaSlicer?
Next, we have Prusa Slicer. Here is the complete workflow for it.
- Go to Print settings and search for Skirt and Brim.
- Set the brim width to 5-15 mm and brim type (Outer).
- Add a separation gap, preferably of 0.1mm.
- Just as done previously, we will again slice the model and check the preview to see the brim.
Official docs: https://help.prusa3d.com/article/skirt-and-brim_133969
How to Add a Brim in Cura
Individuals who use Cura will need to go through the following steps:
- Open the Build Plate Adhesion section.
- Set your adhesion type to brim.
- Adjust the line count and brim distance. Most individuals usually use 8-15 lines.
- Finally, slice and inspect the model to check the correctness of your settings.
Official reference: https://all3dp.com/2/3d-printing-raft-brim-and-skirt-all-you-need-to-know/
How to Add a Brim in Creality Print
For those using Creality Print, the steps don’t vary much.
- Once again, you will import a model and open the Others section.
- Locate the brim settings and select the needed brim type, width, and gap.
- Slice the model and inspect the first layer in the preview to confirm the brim looks correct.
Official reference: https://www.creality.com/blog/3d-printing-brim-explained
Mouse Ear Brim: Add Adhesion Only Where You Need It
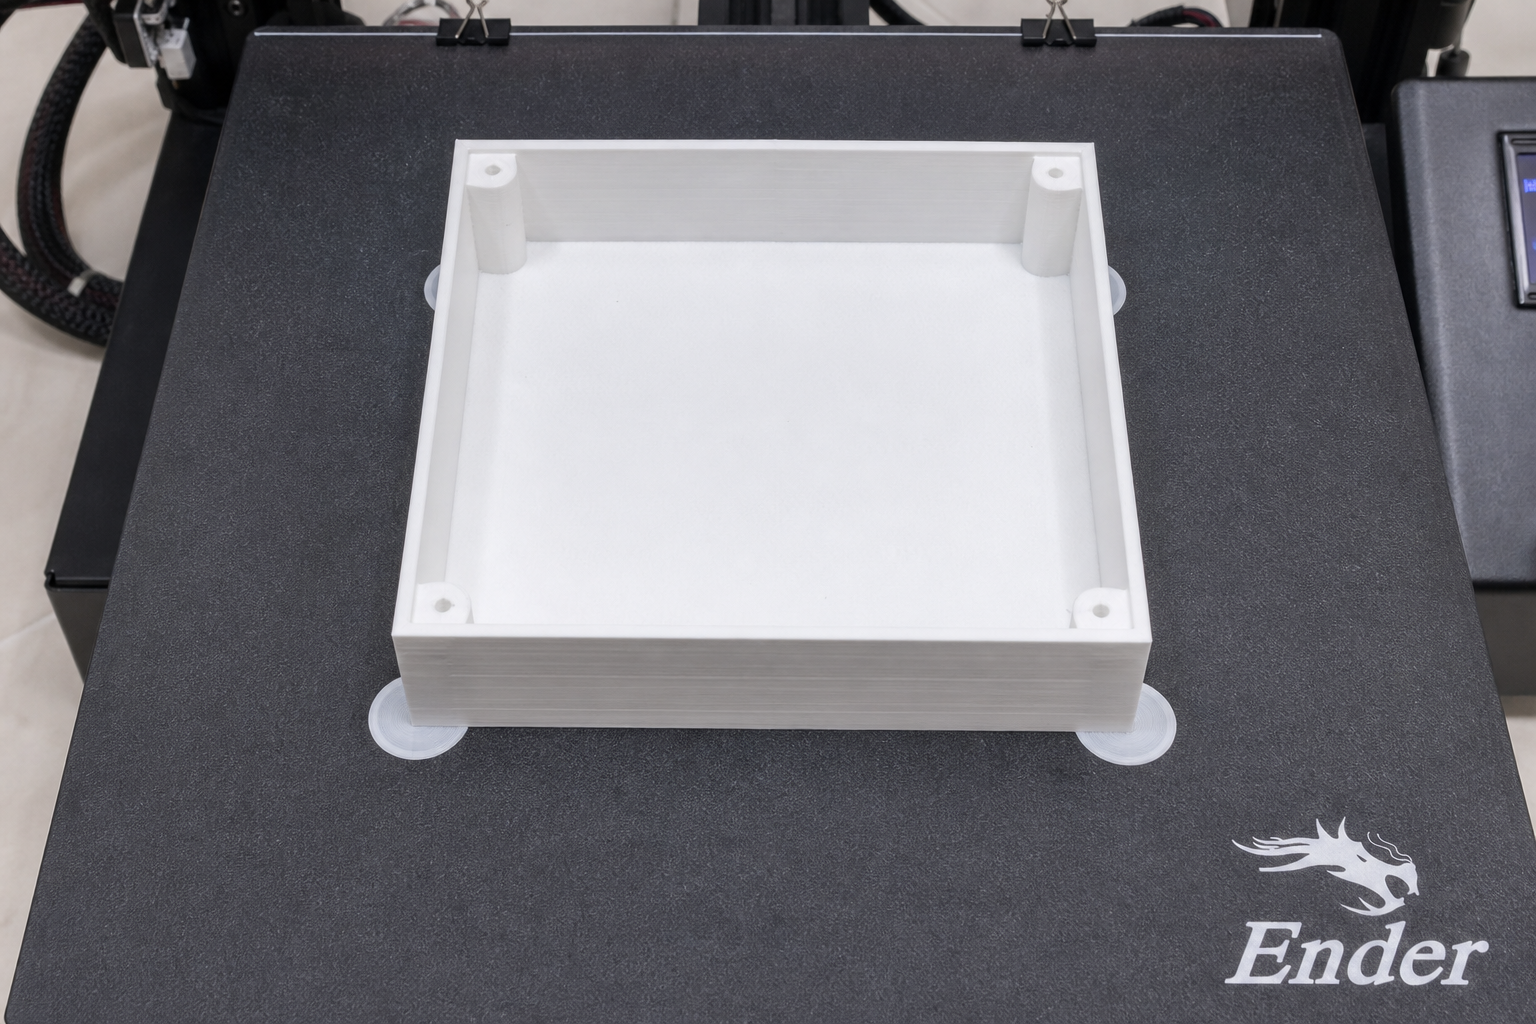
If all other options fail to satisfy your needs, shift to a mouse ear brim. It’s a special adhesion technique that helps cover the flaws of a traditional brim.
A standard brim wraps around the entire bottom edge of the model, but 3D printing with a mouse ear brim allows you to place small rings around warping corners. These circles often look like mouse ears from afar, hence getting the name. With this option, you will:
- Use the least amount of adhesion material.
- Have no difficulty in removing the brim at the end.
- Not damage the bottom surface.
- Print large models with cleaner edges.
How to Use it:
When it comes to using the Mouse ear brim, you can go with any slicer. For those using the Bambu Studio or Orca slicer, the process is simpler because these options have an in-built brim ears feature. You need to activate it, and the slicer automatically finds the sections needing brim ears.
However, if your slicer doesn't have this option, there is no need to worry. You can always create mouse ears manually in the CAD software. Just add flat cylinders with a height of 0.2mm and a diameter of 10mm to each corner. Later, you can export it all as a single file and use it while printing the model.
How to Remove Brim from 3D Print
At this point, a majority of 3D printing enthusiasts must have understood exactly what a brim is. What remains now is how to remove a brim from a 3D print.
There are a few options, including:
- Peeling by hand: For brim gaps of 0.1 mm+, you can peel off the brim with your hands.
- Using a scraper or hobby knife: For lower gap brims, it is recommended to use a thin blade or scraper, as the bonding is more aggressive.
- Flexing the build plate: With a flexible steel build plate, you need to bend it to remove the brim.
- Cleanup: At the end, lightly sand the entire area. It helps remove any remaining marks.
The removal and cleanup aren't hard, but make sure you use the right option. Moreover, always let the print cool completely before removing the brim to avoid damaging the print.
Now with the brim off, you can remove the 3D print as well. In case you need help with that, see our guide on how to remove a 3D print from the bed.
Skirt vs Brim vs Raft: How a Brim Compares
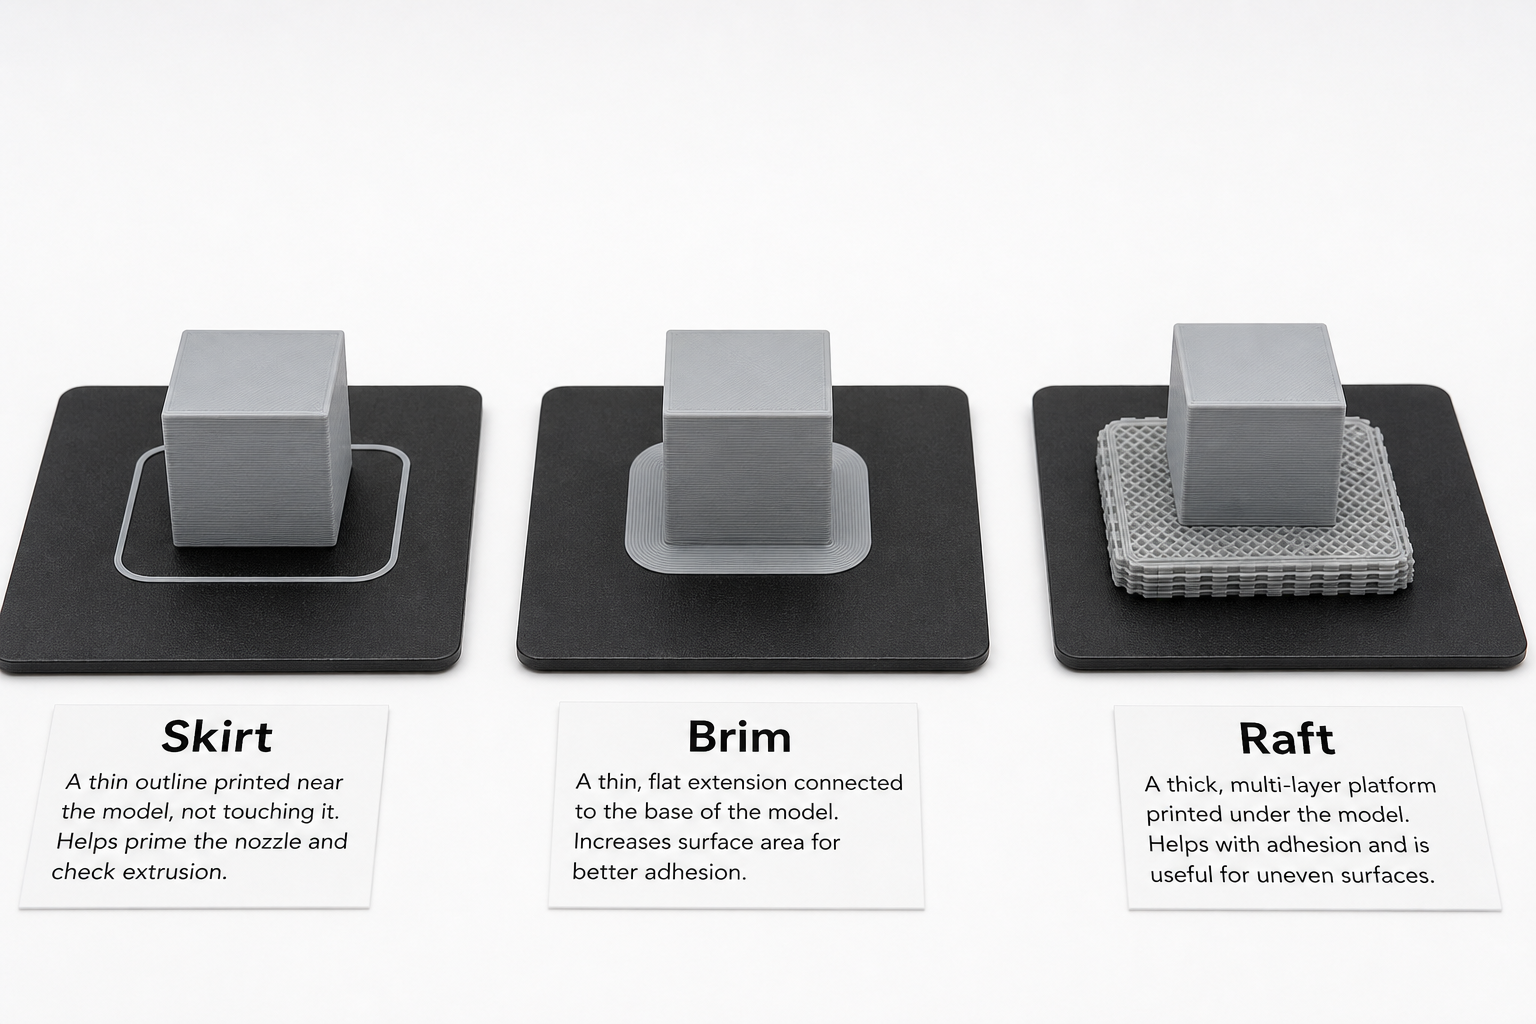
Apart from brim, there are also skirts and rafts, each serving a different purpose. When doing a skirt vs brim vs raft comparison, we see that a brim offers the best balance of adhesion and ease of removal.
Skirt vs Brim: When a Skirt Isn't Enough
When comparing skirt vs brim, we see that where a skirt lacks in a few areas, a brim doesn’t.
| Feature | Skirt | Brim |
|---|---|---|
| Touches model | No (printed nearby) | Yes (attached to edge) |
| Adhesion | No | Yes |
| Purpose | Primes nozzle; quality check | Prevents warping; anchors model |
| Removal | N/A (not attached) | Easy peel or knife |
So, to decide between skirt vs brim for a 3D print, check the print first. If the first layer looks fine but the corners detach later, upgrade to brim.
Brim vs Raft: When to Upgrade from Brim
For brim vs raft, we suggest switching only when a properly configured brim under all the right conditions fails to prevent warping.
| Feature | Brim | Raft |
|---|---|---|
| Contact area | Bottom edge only | Entire bottom surface |
| Material usage | Low (single-layer) | High (multi-layer) |
| Bottom Quality | Clean (minor marks) | Rough (raft texture) |
| Adhesion | Medium to strong | Strongest |
| Print time | Minimal | Significant |
When to upgrade from brim to raft: Only consider a raft when a brim combined with the correct bed temperature and proper bed prep still fails to hold the print. Common scenarios: printing ABS without an enclosure, a severely uneven bed, or extremely small contact points where even a wide brim isn't enough.
Bottom line: Start with a skirt. If adhesion fails, try a brim. Only escalate to a raft as a last resort.
Frequently Asked Questions over 3D Print Brim
What's the point of a brim in 3D printing?
A brim increases the first layer's contact area with the build plate, which prevents warping and keeps small or tall models anchored during printing. It's especially useful for materials like ABS and Nylon that shrink as they cool.
What is the brim type in 3D printing?
Most slicers offer outer brim, inner brim, and an outer+inner brim. Slicers like Bambu Studio offer an auto brim feature that detects warp-prone areas and applies brim accordingly.
How do I add a brim to my 3D print?
You will need to look for the Build Plate Adhesion option for the Brim selection feature and select the adhesion type. You can either set the values manually or, in some cases, the slicer automatically adjusts values. See the slicer-specific steps in this guide for a detailed understanding.
Do you need a brim for PLA?
In most cases, no. PLA sticks well to PEI sheets, so any additional adhesion isn't required. However, if the PLA model has a very small base or a long height, you might consider using a brim.
Comments ()