How to Clean and Unclog a 3D Printer Nozzle (Step-by-Step)
Nozzle clogged? Learn how to identify, fix, and prevent 3D printer nozzle clogs. Covers cleaning needles, cold pulls, PLA dissolving methods, and routine maintenance tips.
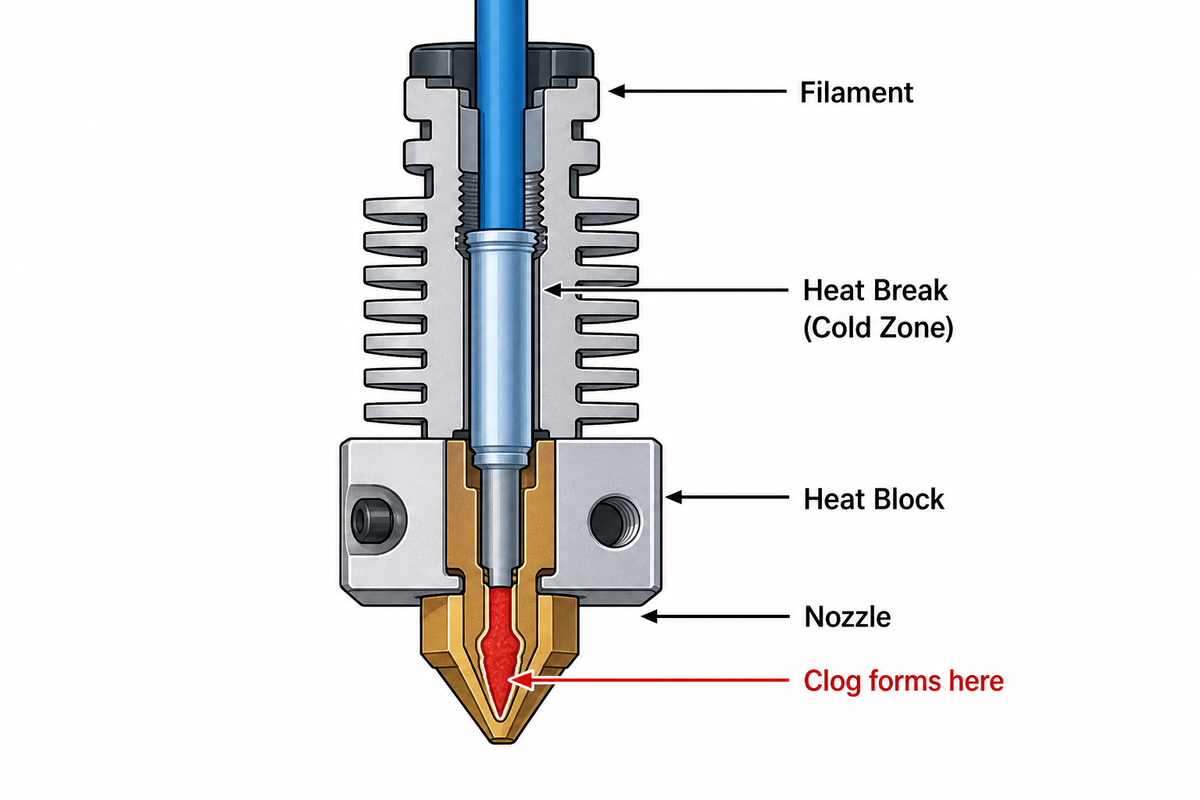
A clogged nozzle is one of the most common problems every 3D printer owner runs into, but it's quite easy to fix. Unclogging a 3D printer's nozzle is simple, and even a beginner can do it. This guide will help you understand how to clean a 3D printer nozzle and how to identify different types of blockages.
How to Tell If Your 3D Printer Nozzle Is Clogged?
Before jumping to how to unclog your 3D printer nozzle, one must learn to identify the signs. At times, users confuse technical issues with blocked nozzles, but that's where one needs to know the signs.
Some common signs include:
- Under-extrusion: The most significant sign that your nozzle is clogged is under-extrusion. In such circumstances, your printer produces thin strands with gaps.
- No extrusion at all: A more serious sign is when there is zero extrusion, or in simple words, the printer head is moving, but nothing is coming out. This is a clear sign of blockage within the nozzle.
- Clicking or grinding sounds: Blocked nozzles also give out a clicking or grinding sound. So, if you hear such sounds, that means there is some level of blockage.
- Filament curling up: Another clue you can't miss is whether the filament that comes out of the nozzle curls up or reaches the surface. With clogged or unclean nozzles, the filament usually flows back up and starts to stick to the nozzle's tip.
- Inconsistent first layer: Finally, there will be inconsistent prints, especially in the first layer of your design. Some areas of the first layer will be smooth, but some might have gaps or unevenness.
An efficient way to confirm your suspicions is by running a quick test. Just heat the nozzle to the required temperature and manually push filament through it. If the filament doesn’t flow out smoothly, your suspicions of a clog are absolutely correct, and you can start with ways to unclog a 3D printer nozzle.
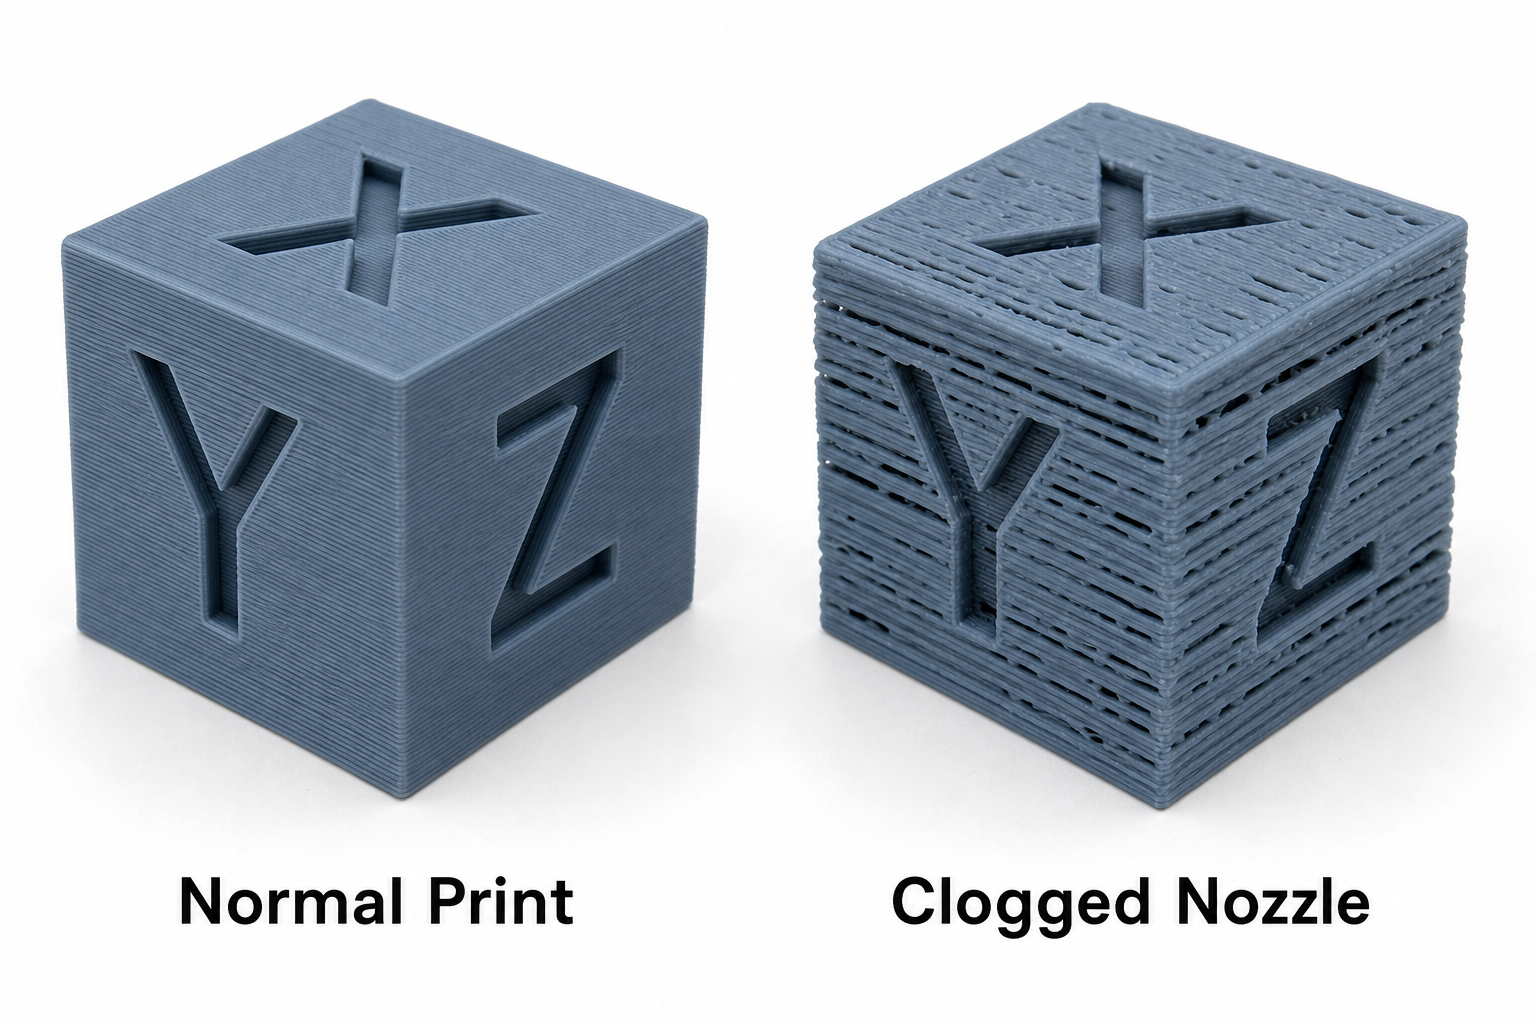
Common Causes of 3D Printer Nozzle Clogs
While understanding the signs of clogged nozzles is important, one should also be aware of the reasons behind this issue.
- Extremely low printing temperature: A very low temperature means your filament won't melt properly, and once the partially melted filament reaches the nozzle, it starts to stick to the edges. Usually, beginners lower the temperature when trying something new, but this results in blockages, and you will end up having to clean the 3D printer nozzle.
- Dust and debris issues: Once the filament collects dust particles, these can enter the machine's nozzle and settle at the hot end. Over time, these contribute to blockages.
- Wet / moisture-damaged filament: Moisture can also cause your 3D printer nozzle to clog. Some materials, like Nylon and PETG, absorb water and, upon heating, release steam bubbles. These bubbles and residue together form blockages. Storing filament correctly goes a long way; we cover this in our FDM 3D printing guide.
 Ryan Mitchell
- Material residue from filament changes: Switching from a high-temp material (e.g., PETG at 240°C) to a lower-temp one (e.g., PLA at 200°C) can leave residue that doesn't fully melt at the lower temperature that blocks the nozzle.
- Heat creep: We also see that heat creep is a reason behind your printer's clogged nozzle. Here, heat travels up the hot end into the cold zone, causing the filament to soften and jam above the nozzle.
- Old and poor-quality filament: A cheap or low-quality filament can also contribute to blockages because it doesn't provide adequate material control.
How to Fix a Partially Clogged 3D Printer Nozzle
When it comes to clogged nozzles, there can be partial clogs or complete blockages. Now, if you are facing a partial clog, where filament is coming out but not evenly or not enough, then use the following cleaning hacks.
Method 1: Cleaning Needle
It is the most effective way of cleaning any dirty nozzle. Start by:
- Heating the nozzle to the temperature required for the filament.
- Once you get the required temperature, carefully insert a needle (usually 0.3–0.4mm) into the nozzle opening from below.
- Now move the needle up and down several times to remove the debris present inside. The sharp needle easily breaks down any solid particles.
With the process complete, you will have a perfectly normal functioning nozzle, and it won't require more than 2 minutes.
Method 2: Filament Push-Through
At times, the needle method doesn't solve the problem, and we suggest using the filament push-through method.
- Heat the printer's nozzle, preferably 10–20°C above the normal printing temperature.
- With the temperature set higher, you will need to insert the filament and push it manually using the load filament function. If your machine allows, you could push by hand with the lever option.
- Keep applying pressure to force the filament out of the nozzle. This filament also pushes out the debris stuck to the nozzle's edges.
This method is quite effective when the blockage is caused by low temperature. With all the extra heat, all the unwanted particles can be removed easily.
Method 3: Cold Pull (Atomic Method)
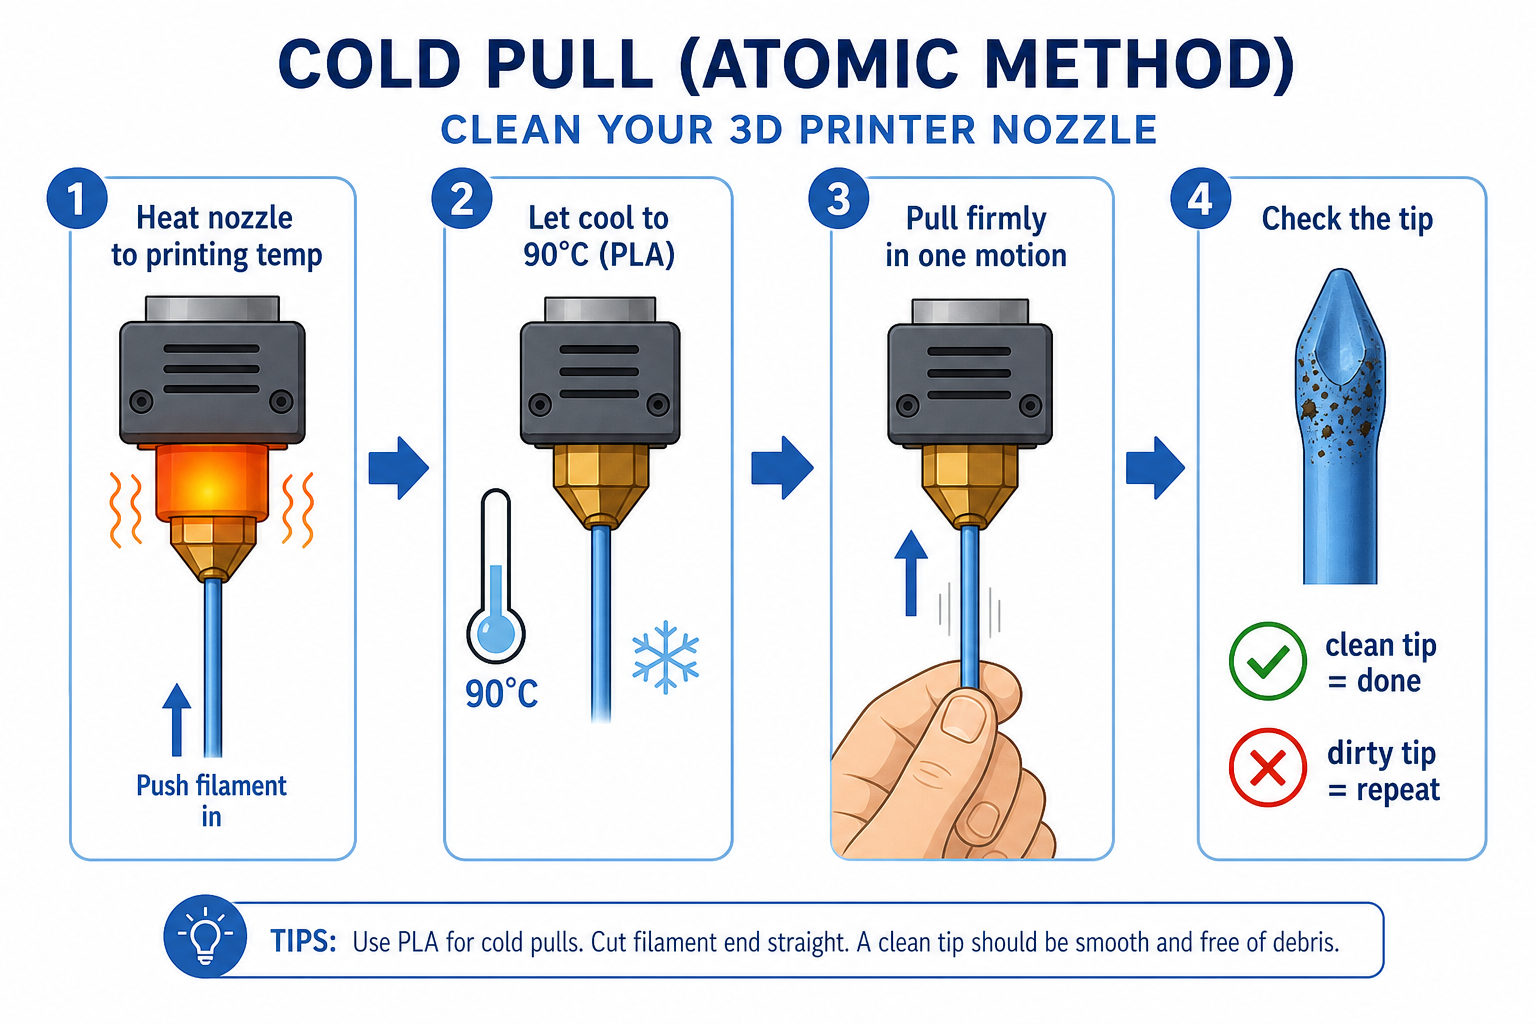
In case these methods don't work, there is no need to lose hope. We suggest you move on to the third way, the cold pull. It's one of the most thorough cleaning techniques for clearing partial clogs.
- The first thing to do is heat the nozzle to printing temperature and insert either Nylon or PLA filament.
- With the filament inside, let the nozzle cool down (approximately 90°C for PLA or 140°C for Nylon).
- Next, pull the filament in one go to clear out the debris stuck inside.
- The filament tip should come out shaped like the inside of the nozzle, bringing debris with it. Repeat 3–5 times until the tip comes out clean.
Even though PLA and Nylon are both recommended, from our personal experience, Nylon works best.
Method 4: Cleaning Filament
You could also fix partial clogs with a cleaning filament. These cleaning filaments are designed for clearing jammed pathways.
- Firstly, heat the nozzle according to the special filaments' requirements.
- Then gently put the filament through the nozzle.
- Start extruding the filament to pull out the contaminants.
How to Unclog a Severely Clogged 3D Printer Nozzle
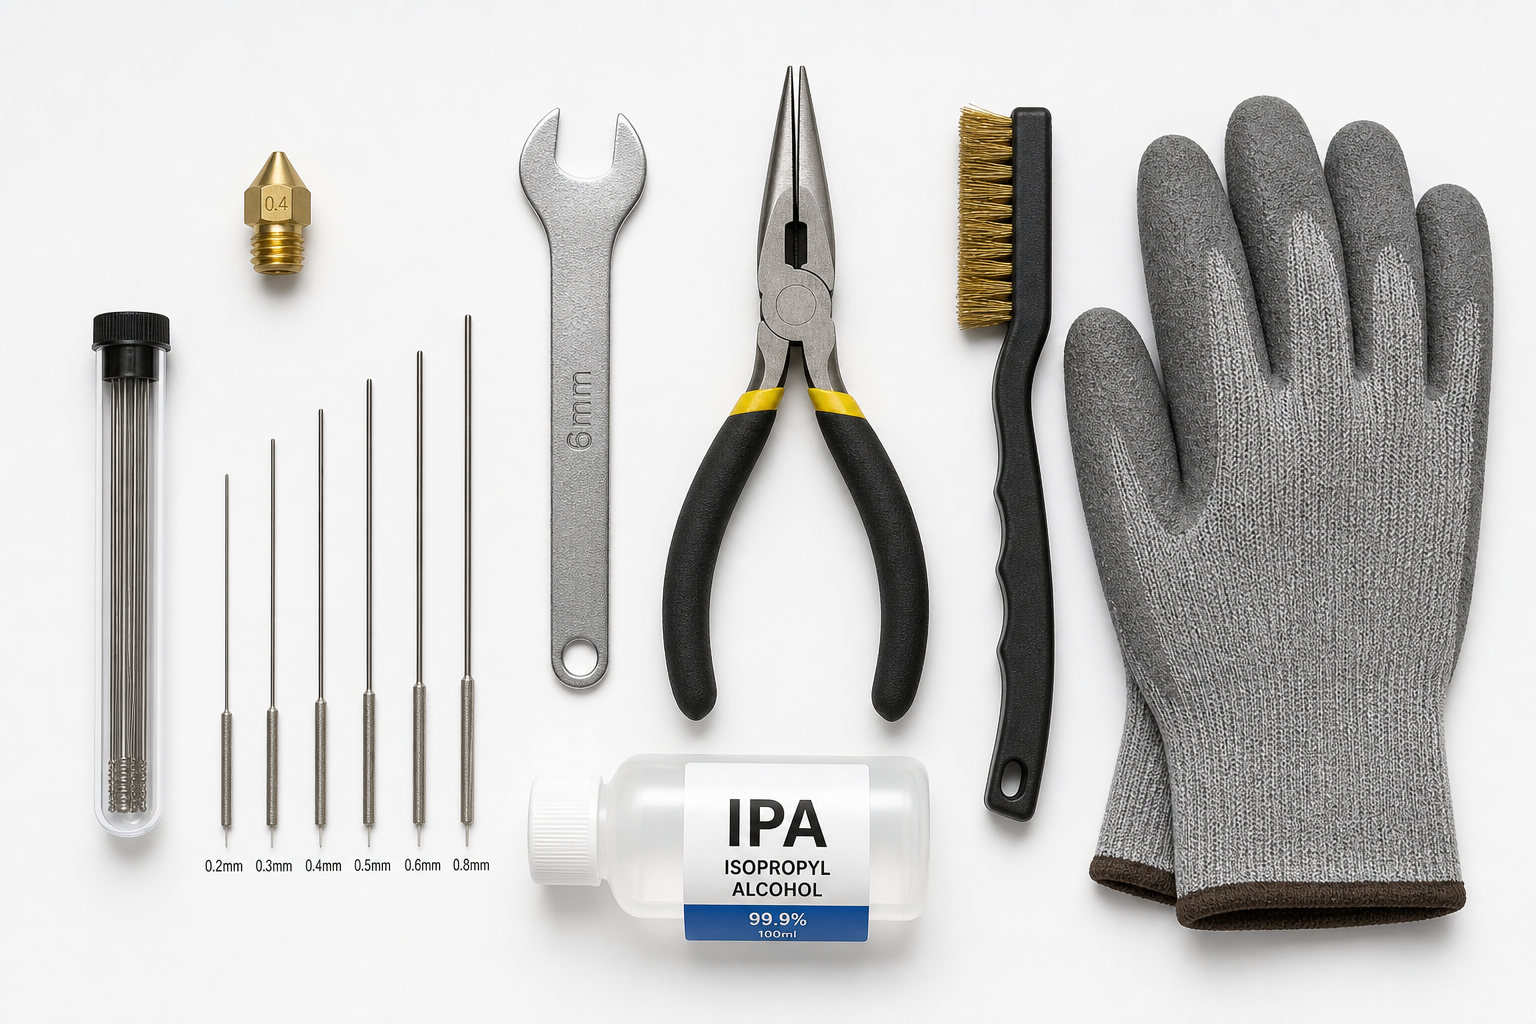
If your machine's nozzle is completely blocked, and nothing comes out, that’s a serious matter. Where partial clogs require only cleaning, here you will need to disassemble the nozzle and clean it thoroughly.
Some methods that fix severely clogged nozzles are:
Method 1: Remove Nozzle and Clean Manually
The first technique is to remove the nozzle and clean it manually. It requires quite a lot of care, as you will be dealing with very hot parts.
- Start by heating the hot end to printing temperature. This prevents stripping the threads, which can happen if you try to unscrew a cold nozzle. Use the correct wrench (usually 6mm or 7mm) to unscrew the nozzle. Keep in mind that the nozzle is hot, and you can't touch it with your bare hands. So, use pliers and gloves and work very carefully.
- Once the nozzle is removed, use needles or drills to clear blockages.
- Reinstall the nozzle before it cools down and ensure not to tighten it too much.
Method 2: Acetone Soak (ABS / ASA Only)
Again, this method requires you to remove the nozzle and dip it in acetone solution for about 12-24 hours.
- Use pliers to remove the heated nozzle.
- Dip the nozzle into the acetone solution, and the chemical will help dissolve ABS and ASA residue. However, if you're using PLA, PETG, or nylon filaments, we recommend using the next method.
- Once the residue is dissolved and the nozzle is clear, clean it and screw it back on.
Method 3: How to Dissolve PLA from a Nozzle
Acetone is great at dissolving substances like ABS and ASA, but doesn't work for PLA. For PLA, we suggest using the heat method, soaking it in sodium hydroxide, or replacing the nozzle with a new one.
Option 1, or the recommended heat method, involves using a heat gun to remove the excessive residue.
- Start by using a heat gun to heat the nozzle to about 250–300°C.
- It helps soften the PLA, and you can push a needle or wire inside to clear the passage.
Do note that this can only be done when the nozzle is made from brass or hardened steel. If your nozzle has a PTFE liner, don’t even try to heat it above 260°C, or else it will release toxic fumes.
Option 2 is to soak the nozzle in sodium hydroxide (NaOH) solution. It quickly removes all the hard PLA buildup.
- Remove the nozzle from the 3D printer.
- Submerge it in sodium hydroxide (NaOH) for a few hours, and let the residue dissolve.
Since the solution is corrosive, wear gloves and safety goggles before beginning the process.
We also have option 3, replace the nozzle. Brass nozzles are not that expensive, costing about $2–5. If you don't want to deal with corroding chemicals or heat guns, buy a new nozzle.
Method 4: Ultrasonic Cleaner
Another nozzle cleaner recommended is the ultrasonic cleaner. It usually removes stuck debris in minutes.
- Just put the clogged nozzle in an ultrasonic cleaning bath with water or any cleaning solution. Run this for 10–15 minutes.
- Thanks to the cleaner, stubborn residue starts to come off. In minutes, your nozzle is back to its original form.
When to Replace Your 3D Printer Nozzle Instead of Cleaning
Undoubtedly, the above-mentioned methods are great at cleaning clogs, but at times, you are left with no option but to replace the nozzle. Here are a few examples of when you should give up cleaning and find a new nozzle.
- You've tried multiple cleaning methods, and it's still clogged: If even after trying multiple methods, the nozzle doesn't extrude material properly, then the damage might be irreversible, and a new nozzle is your only option.
- You’ve printed abrasive materials: The problem with brass nozzles is that carbon fiber, glow-in-the-dark, and metal-fill filaments wear them out. In such scenarios, you get poor quality prints even if you have cleared all the clogs. So, the only option left is to buy a new nozzle.
- Visible deformation: If the nozzle looks worn out or you feel that it's lost its original shape, then unclogging the path won't make any difference. You need to replace the old gadget with a new one.
- Age: As we explained earlier, brass nozzles last between 3 and 6 months with regular use. Brass nozzles cost $2–5. If you print abrasive materials like carbon fiber or glow-in-the-dark, consider upgrading to a hardened steel nozzle ($8–15). They last much longer and resist wear.
How to Clean Your 3D Printer Nozzle (Routine Maintenance)
With regular care and a few preventive measures, you will never face a clogged nozzle crisis. Some great habits that save you from stress include cleaning the nozzle after every switch.
It's common to switch between materials while 3D printing, but it also means that there might be some unmelted residue left in the nozzle. You could perform a cold pull or run a short length of cleaning filament through the nozzle before loading the next filament. That way, residue never builds up in the first place.
Similarly, external cleaning with a brass wire can remove all the filament stuck to the nozzle. If you do this after every print, there will hardly be any clogs. For a full printer cleaning routine, see our beginner's guide to using a 3D printer.
3D printer owners can also perform internal cleaning depending on their usage. For example, if you’re mainly printing PLA, do one round of cold pulls after every 50–100 print hours. However, those using multiple materials can do a cold pull after each material change.
It's also recommended to perform quick extrusion checks using a small amount of filament to judge the nozzle's condition. These small tips help you avoid clogs and blockages from the very start.
How to Prevent 3D Printer Nozzle Clogs
You can prevent these nozzle clogs from starting by simply:
- Storing filament properly: Keep filament in a sealed container or dry box with desiccant packets. Moisture is one of the top causes of clogs, especially for Nylon and PETG.
- Using quality filament: Always go for the best quality filaments, preferably from brands like Bambu Lab, to avoid inconsistencies.
- Setting the temperature: The nozzle suffers the most from incorrect temperature. So, check what temperature suits a specific filament.
- Adding a filament filter/guide: A simple printed filament guide with a small piece of sponge filters dust before it enters the extruder. Free models are available on MakerWorld and Printables.
- Not leaving filament loaded for weeks: If you're not printing for a while, retract and remove the filament. Filament left in a hot nozzle for extended periods can degrade and carbonize, creating stubborn clogs.
- Checking the hot end fan: A failing or dusty cooling fan causes heat creep, one of the harder-to-diagnose causes of clogs. Make sure the fan spins freely and isn't blocked.
3D Printer Nozzle Cleaning Methods: Quick Reference Table
| Method | Clog Severity | Disassembly? | Time | Best For |
|---|---|---|---|---|
| Cleaning needle | Partial | No | 1–2 min | Quick first attempt and minor blockages. |
| Filament push-through | Partial | No | 2–3 min | Temperature-related clogs and leftover material residue. |
| Cold pull (Atomic method) | Partial–Moderate | No | 5–10 min | Best all-around method and best for internal wall cleaning. |
| Cleaning filament | Partial | No | 3–5 min | Material changes and preventive maintenance. |
| Nozzle removal + needle | Severe | Yes | 10–15 min | Full blockage and solid debris stuck inside |
| Acetone soak (ABS/ASA only) | Severe | Yes | 12–24 hrs | ABS / ASA residue only |
| Heat gun | Severe | Yes | 5–10 min | Removing hardened PLA clogs in all-metal nozzles (no PTFE!) |
| NaOH soak | Severe | Yes | Several hrs | PLA clogs (wear gloves + goggles) |
| Ultrasonic cleaner | Severe | Yes | 10–15 min | Multi-printer users, batch cleaning |
| Replace nozzle | Any | Yes | 2 min | When cleaning fails, or the nozzle is worn out or loses its shape. |
FAQ
Q: How to dissolve PLA from a nozzle?
To dissolve PLA, you cannot use acetone. The most effective ways are using a heat gun, soaking the nozzle in NaOH solution, or simply replacing it with a new one.
Q: How often should you clean the nozzle on a 3D printer?
When you use PLA regularly, it is recommended to perform a cold pull after every 50-100 print hours. However, for those using multiple materials, it’s better to do a cold pull after every change.
Q: How to get dried filament out of a nozzle?
To remove dried filament, you can use a cold pull or push-through method. Each one is effective in removing unwanted residue. However, for carbonized filament, you will need to first remove the nozzle and clean it thoroughly.
Q: How to unblock a 3D printer extruder?
An extruder jam is different from a nozzle clog. If the extruder gears are grinding but filament isn't moving, check for: (1) a clogged nozzle downstream, (2) a tangle on the filament spool, (3) the extruder tension being too tight or too loose, or (4) a stripped section of filament where the gear has chewed through it. Cut off the damaged section and re-feed.
Q: Can you use a nozzle cleaning kit?
Yes, nozzle cleaning kits cost around $5 to $15 and include needles in multiple sizes, a brass brush, and sometimes a small wrench. With such kits at home, you can easily remove partial clogs. That said, the most effective method, the cold pull, doesn't require any special tools, just a piece of filament.
Comments ()