3D Printing Raft: What It Is, Best Settings & Slicer Setup Guide
A raft is the strongest adhesion tool in your slicer — and also the most overused. Here's when it actually saves a print, when it just wastes filament, and the one setting that decides whether it peels off clean or ruins your bottom layer.
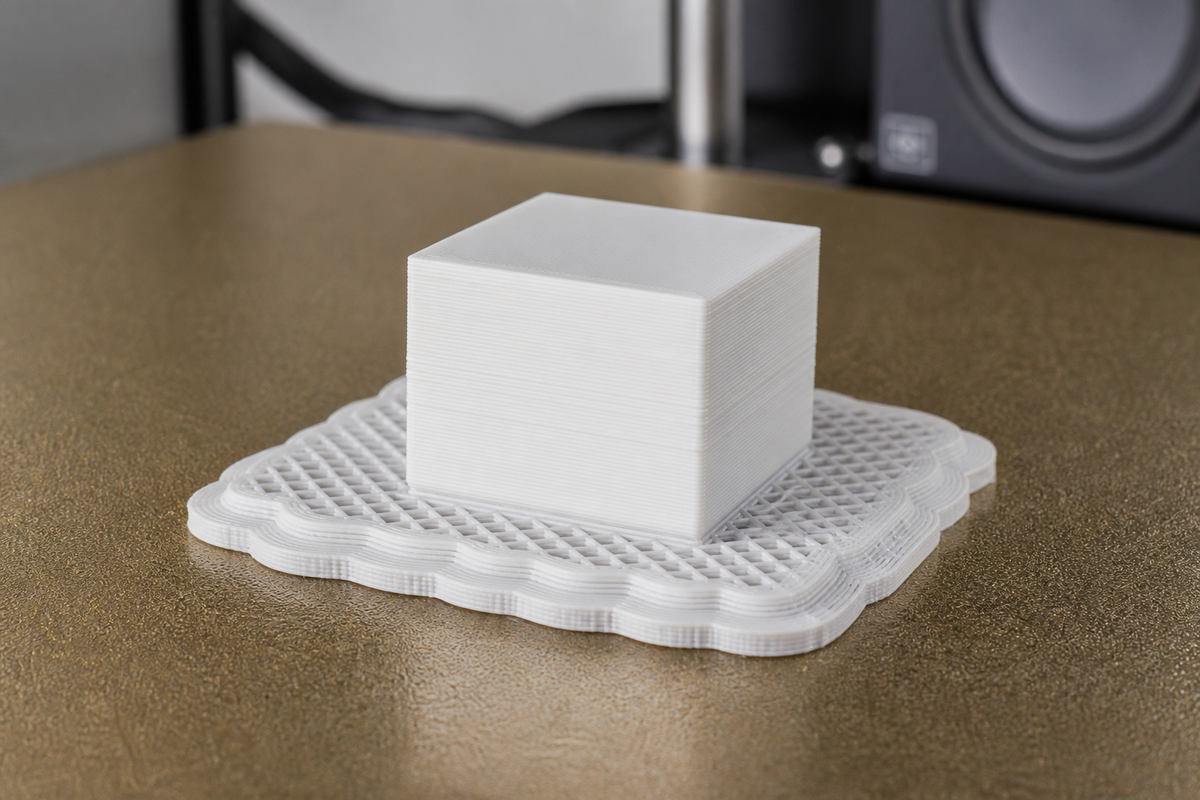
A 3D printing raft is one of the strongest adhesion tools in your slicer — and also the one you should reach for last. When brims and proper bed prep fail, a raft can save a print that would otherwise warp or detach. Whether you're printing with ABS, ASA, or Nylon, you need strong adhesion to ensure successful prints, and that's exactly what a raft will help you with.
What Is a Raft in 3D Printing?
A 3D printing raft is a temporary multi-layer platform printed on the build plate before your model, providing a stable foundation that improves bed adhesion and prevents warping.
Your 3D printer will first print a raft or a grid-like structure and then build the model on top of it. That way, your model never loses stability, and once printing is complete, you can peel the raft off and discard it.
Now that you know what a raft in 3D printing is, let’s understand its layers. It has three main layers:
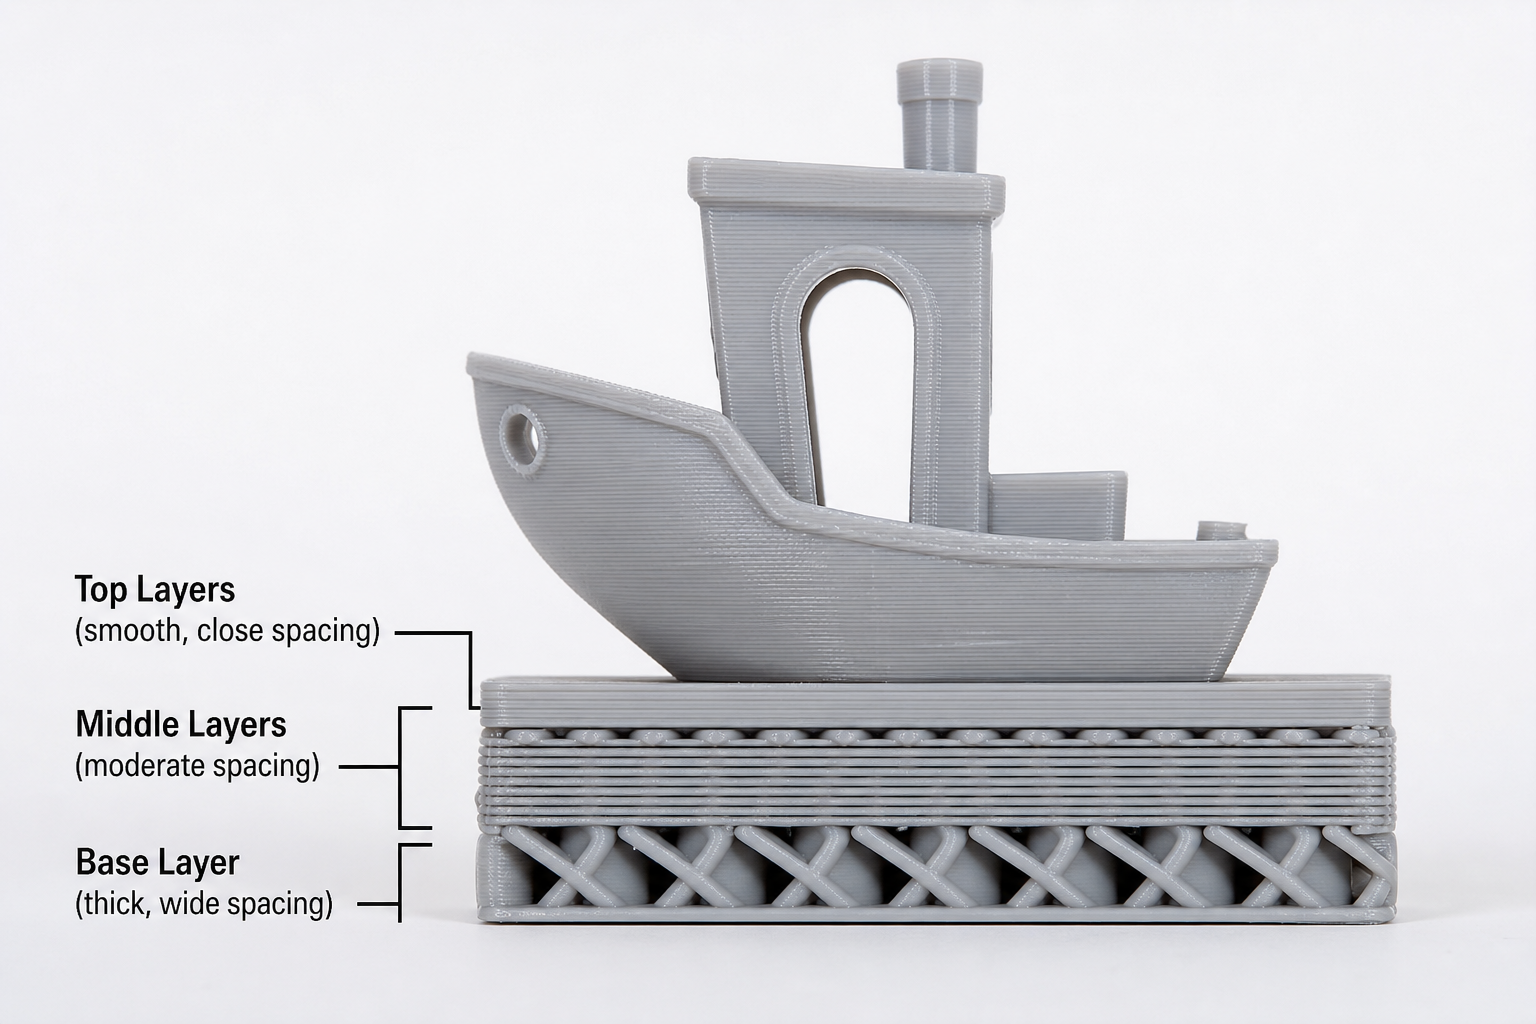
- Base layer: The first layer that is printed slowly and is mainly responsible for providing the grip to the bed surface.
- Middle layer(s): It helps provide height to the model while also helping with the structural transition.
- Top layer(s): This is the smooth surface where the model will sit. The more the top layers, the better the quality of the model.
When to Use a 3D Printing Raft (and When to Skip It)
While using a 3D printing raft looks very beneficial, there will be some of you who would ask once whether one should use a raft for 3D printing in all circumstances? The answer is no. We believe using a raft for 3D printing should be the last resort, when all else fails.
Here are a few situations where using a raft becomes compulsory:
- When using warp-prone filaments, such as ABS and Nylon.
- The contact area is too small, or a brim doesn't work.
- Having an uneven or damaged build plate.
- You've tried glue stick or hairspray, but the print still lifts off the bed.
Skip the raft when:
- Working with PLA or PETG on a clean bed.
- The model has a large flat base.
- You need to save material and time.
- A brim already works.
3D Printer Raft Settings Explained
Undoubtedly, using a 3D printer raft could help your model gain a stable structure, but if you fail to use the correct 3D printing raft settings, all your effort goes to waste.
Here is a short overview of the settings involved.
| Parameter | Recommended Value | What It Controls |
|---|---|---|
| Raft Top Layers | 2–3 | Greater = smoother model bottom; fewer = easy removal |
| Raft Base Layers | 1–2 | Thick, slow-printed foundation for bed adhesion |
| Raft Contact Z Distance (Air Gap) | 0.15–0.25 mm | Gap between raft and model; controls removal difficulty |
| Raft Offset / Expansion | 3–5 mm | Raft extension beyond the model footprint |
| Above Raft Speed | 50–75% of normal first layer speed | Speed for the model's first layer |
Raft Contact Z Distance: The Setting That Makes or Breaks Removal
A setting that could make or break your print would be the 3D printing raft contact Z distance, which is the air gap between the top of the 3D printing raft and the bottom of your model.
Despite being less than a quarter of a millimeter, it can decide the 3D print's fate. Thus, every beginner needs to learn to adjust this setting before any other parameter.
Usually, if the value is too small, such as under 0.1mm, the model will stick to the raft and won't come off. However, if the value exceeds 0.35 mm, there will be no proper bonding.
We feel the ideal range is between 0.15 and 0.25 mm. Still, different materials have different values.
- ABS: Around 0.15 mm to prevent warping.
- PLA: 0.20–0.25 mm for easy removal.
- PETG: Not less than 0.20 mm because it will not peel off.
Some beginners might wonder at this stage about how many layers to use in 3D printing with raft. Well, we recommend 3–5 layers total (roughly 1–1.5 mm thickness). However, more than the layer thickness, you should focus on the raft contact Z distance. Make sure it's within 0.15-0.25 mm.
3D Printing Raft Settings by Material
Along with these parameters, there are some material-specific settings for rafts as well.
| Material | Contact Z Distance | Bed Temp | Notes |
|---|---|---|---|
| PLA | 0.2–0.25 mm | 60 °C | Rarely needs raft; brim is usually enough |
| ABS | 0.15–0.2 mm | 100 °C | Most common raft use case; pair with enclosure |
| PETG | 0.2 mm | 80 °C | Sticks aggressively; don't set Z distance too small |
| Nylon | 0.15 mm | 70–80 °C | High shrinkage; raft + enclosure + glue stick |
| ASA | 0.15–0.2 mm | 100 °C | Treat like ABS; enclosure required |
How to Add a Raft in Your Slicer
After learning about the settings and reasons to use a raft, all that's left is to insert it in your slicer.
How to Add a Raft in Bambu Studio & Orca Slicer?
For those of you who have Bambu Studio or the Orca Slicer, the process is simple.
- Start by selecting the model in the 3D printing raft software, then go to the right panel.
- From Build Plate Adhesion, select the raft option.
- You will need to adjust the raft layers, raft contact Z distance, and raft expansion as required.
Since Orca Slicer is a fork of Bambu Studio, you will find the settings and interface almost identical. Someone who can work with one can easily adjust to the other.
Official docs: https://wiki.bambulab.com/en/software/bambu-studio/support
How to Make a Raft in PrusaSlicer
Here are the exact steps to help you understand how to make a raft in PrusaSlicer.
- Begin by opening the print settings and clicking the support material tab.
- Next, set the raft layers to a value greater than 0. You can check the settings table in the previous section to understand which value better suits the situation.
- Also adjust the raft contact distance and raft expansion values.
- Slice the model and check the preview to confirm the raft appears underneath before sending it to print.
Official docs: https://help.prusa3d.com/article/support-material_1698#raft-layers
How to Add a Raft in Cura
For installing a raft in Cura, here is how you should do it.
- You will need to select the model.
- Open the right panel and go to the build plate adhesion option.
- Next, select adhesion type from the list and click on raft.
- Finally, adjust raft air gap, raft top layers, raft base thickness, and raft speed.
- Once done, you can check the output to ensure the parameters are correctly selected.
No matter what kind of software you have, setting up a 3D printing raft isn't complicated. If you have an in-built raft support system, the process becomes simpler.
Official docs: https://support.ultimaker.com/s/article/What-are-Rafts
Removing a Raft from a 3D Print
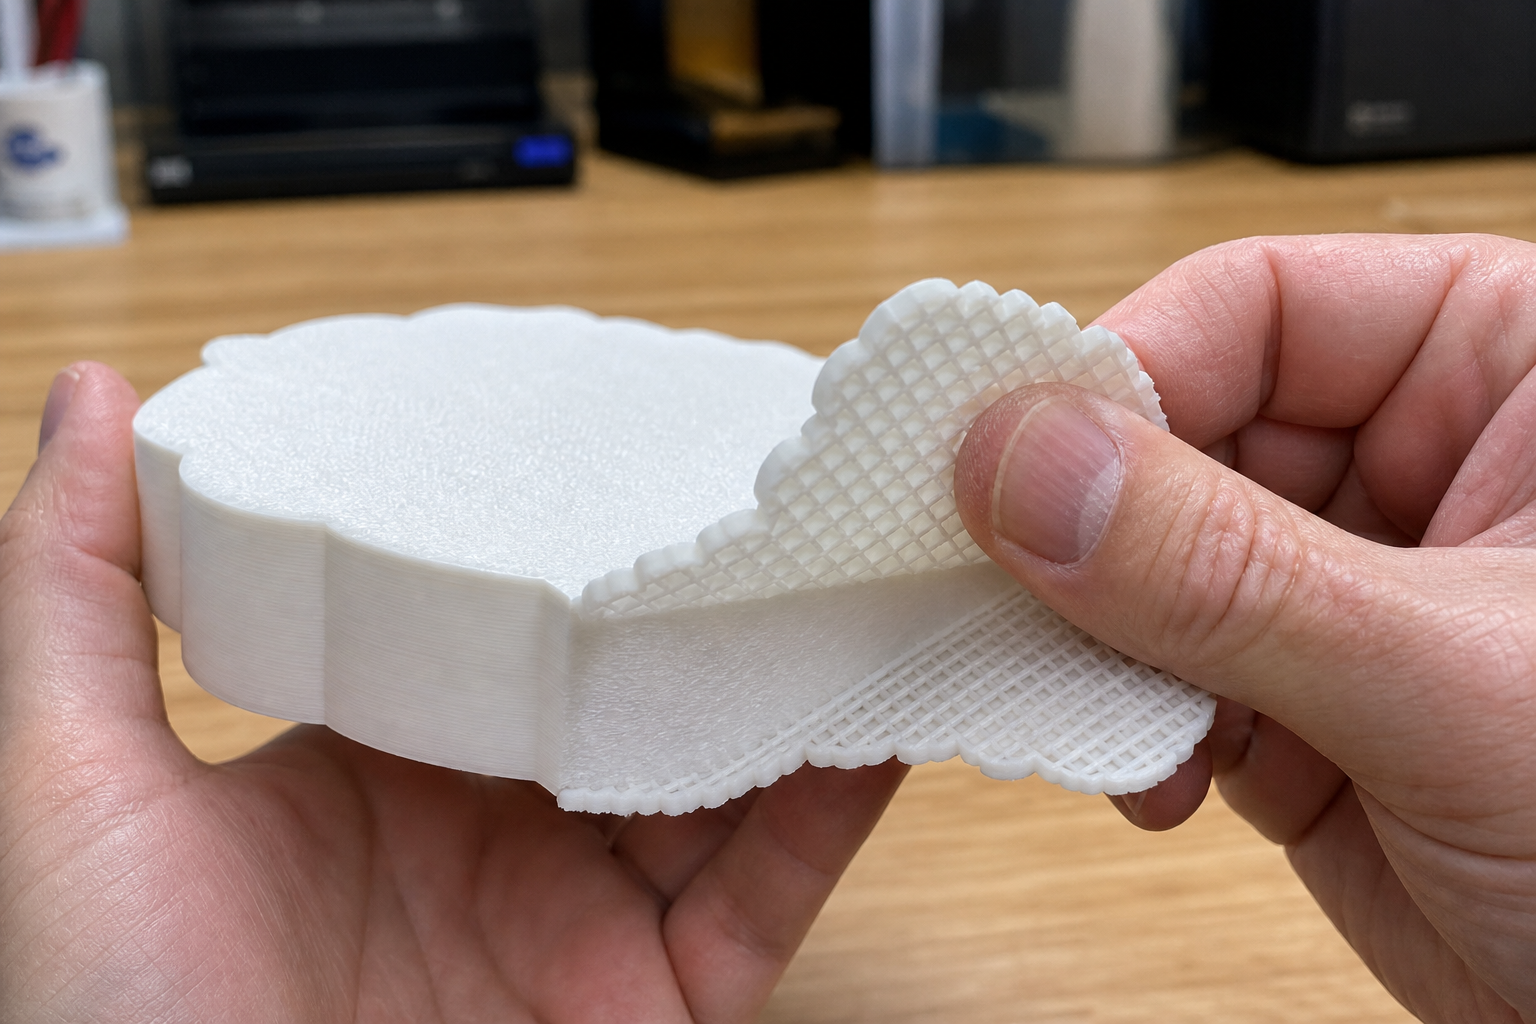
When you've created a 3D print raft, you also need to remove it.
If you think it's a difficult process, you're mistaken. The steps are straightforward and don't take much time or energy.
Step 1: Let the print cool completely
Before starting to peel the raft off, wait for it to cool down completely. If it’s warm and you try to peel off the raft, you could end up damaging the model.
Step 2: Try peeling with your hands
Now with the print at room temperature, you can start peeling the raft by hand. If the Z contact distance was set correctly, the raft should snap off cleanly with a gentle flex.
Step 3: Use a thin knife or spatula
For tougher bonds, you should use a thin knife or a spatula. Gently slide it under the model and slowly push it ahead to detach the model completely.
Cleanup: If the bottom of the model has raft texture residue, lightly sand it with 220-grit sandpaper. It helps remove all kinds of residue.
Troubleshooting shortcuts: At times, unwanted problems arise, but instead of panicking, focus on the solution. For example, if the raft doesn't come off, try increasing the contact Z distance in future. Similarly, if the model detached from the raft midway, decrease the contact Z distance. A few minor changes help you achieve perfection.
Skirt vs Brim vs Raft: When a Raft Is Your Best Option
Skirts, brims, and rafts are all helpful for 3D printing even though they serve different purposes. A skirt ensures the proper functioning of the nozzle, while a brim adds extra adhesion and a raft creates an entirely new surface for the model.
Each serves a different purpose, the question comes down to skirt vs brim vs raft: which gives the best support? Well, here's a quick overview for all three.
Raft vs Brim: When Brim Isn't Enough
When thinking about raft vs brim, we have seen that in most cases brim works fine, but at times with materials like ABS, brims fail. In such conditions, a raft becomes the only solution. Here is a comparison table to understand how, in 3D printing, raft vs. brim make a difference.
| Brim | Raft | |
|---|---|---|
| Contact area | Extends outward from model edges (horizontal) | Covers the entire model footprint (model sits on top) |
| Bottom surface impact | Minor edge marks only | Grid texture across entire bottom |
| Adhesion strength | Medium–strong | Strongest available |
| Material usage | Low | High |
| Removal effort | Easy (snap off, light trim) | Medium (peel + possible sanding) |
| Best for | Most warping issues; large-base models | ABS without enclosure / uneven beds/brim already failed |
Thus, only shift to raft when a brim fails to keep the model together.
Raft vs Skirt: Two Completely Different Tools
Next up we have skirts and rafts. To make one thing clear, rafts and skirts are opposite tools. While a skirt ensures nozzle performance, a raft provides adhesion between the model and base.
So, instead of choosing between the two, it’s better to understand how they help in successfully printing a model.
| Skirt | Raft | |
|---|---|---|
| Touches the model? | No — printed nearby, not connected | Yes — model is printed directly on top |
| Improves adhesion? | No | Yes — strongest adhesion method |
| Primary purpose | Prime nozzle, visually check bed leveling | Solve extreme adhesion/warping problems |
The right choice between skirts vs. brim vs. raft helps you create better quality models.
FAQ
Should I use a raft for 3D printing?
If nothing else works, then you can use a 3D printing raft. In most cases, a brim provides enough support, but if you are dealing with ABS or Nylon, then yes, a raft is a better option.
What is a raft in 3D printing?
A raft is a temporary multi-layered grid printed on a build plate before printing the model. Once the model is printed on the raft, it helps avoid any minor or major warping and can be removed after use.
How thick should a raft be for 3D printing?
Typically, a raft should be 3-5 layers thick or 1-1.5 mm in thickness. However, while maintaining thickness, ensure that you are using the correct Contact Z distance value.
Comments ()