3D Print Infill: Best Density, Patterns & Slicer Settings Guide
Infill is the invisible skeleton inside every 3D print — and the setting most beginners either ignore or max out to 100%. Here's how to pick the right density and pattern without wasting filament or print time.
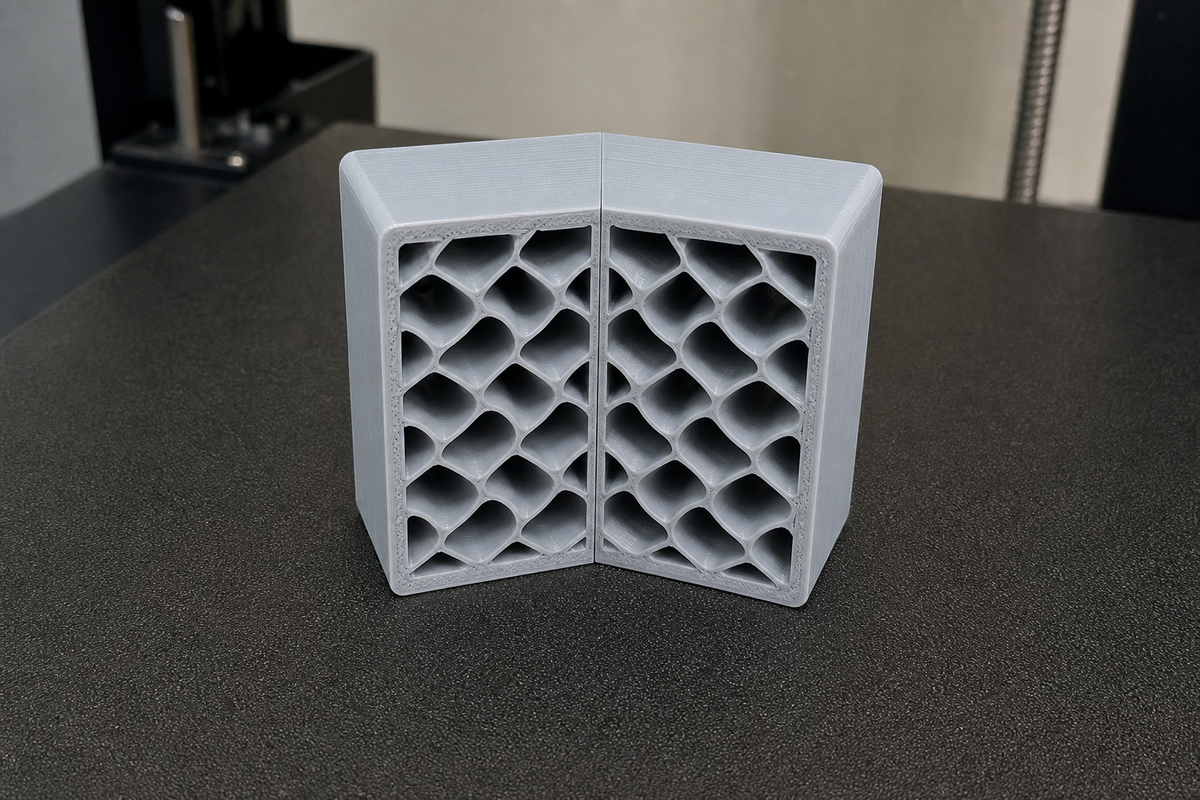
3D print infill is the internal structure printed inside a 3D object. It is one of the most important settings in 3D printing. It affects strength, weight, print time, and how much filament each print uses. Many beginners ignore it or set it to 100%, assuming that more plastic means a stronger part. That’s rarely the case. Too little infill can make a print fragile; too much wastes material and adds hours to the job with little extra strength. The good news is that choosing the right infill is not difficult. A few simple guidelines will help you get stronger prints without wasting time and filament.
What Is Infill in 3D Printing?
3D print infill is the internal structure printed within the outer walls of a model. It acts as a skeleton that determines the part's strength, weight, and filament usage.
Most 3D prints are hollow on the inside. The empty space is filled with a repeating geometric pattern that supports the outer shell while using far less material. It can be a grid, a series of straight lines, waves, cubes, or other shapes depending on the pattern you choose.
A simple way to think about infill is the skeleton of a building. The outer walls are the facade, the part everyone sees. The infill is the structural frame that holds everything up from the inside. If you move that frame even the tiniest bit, it changes 4 things all at once:
- Strength: More infill makes a stronger part, but only up to a point
- Weight: More infill means a heavier part
- Print time: More infill means more time to print
- Filament used: More infill uses more filament
Each slicer has two settings to control infill:
- Infill density: how much material is inside the print. This is measured in percentage form, 0 % being fully hollow and 100 % being fully solid.
- Infill pattern: Determines the shape of that internal structure. Common options include grid, gyroid, cubic, honeycomb, and lines. Each has different strengths and print characteristics.
If you don't know where to start, 20% infill with a grid pattern is a good default for most everyday prints. It’s a good mix of strength, print speed, and filament use, and you can always increase later if the part needs to take more weight or stress.
Best 3D Print Infill Density: How to Choose the Right Percentage
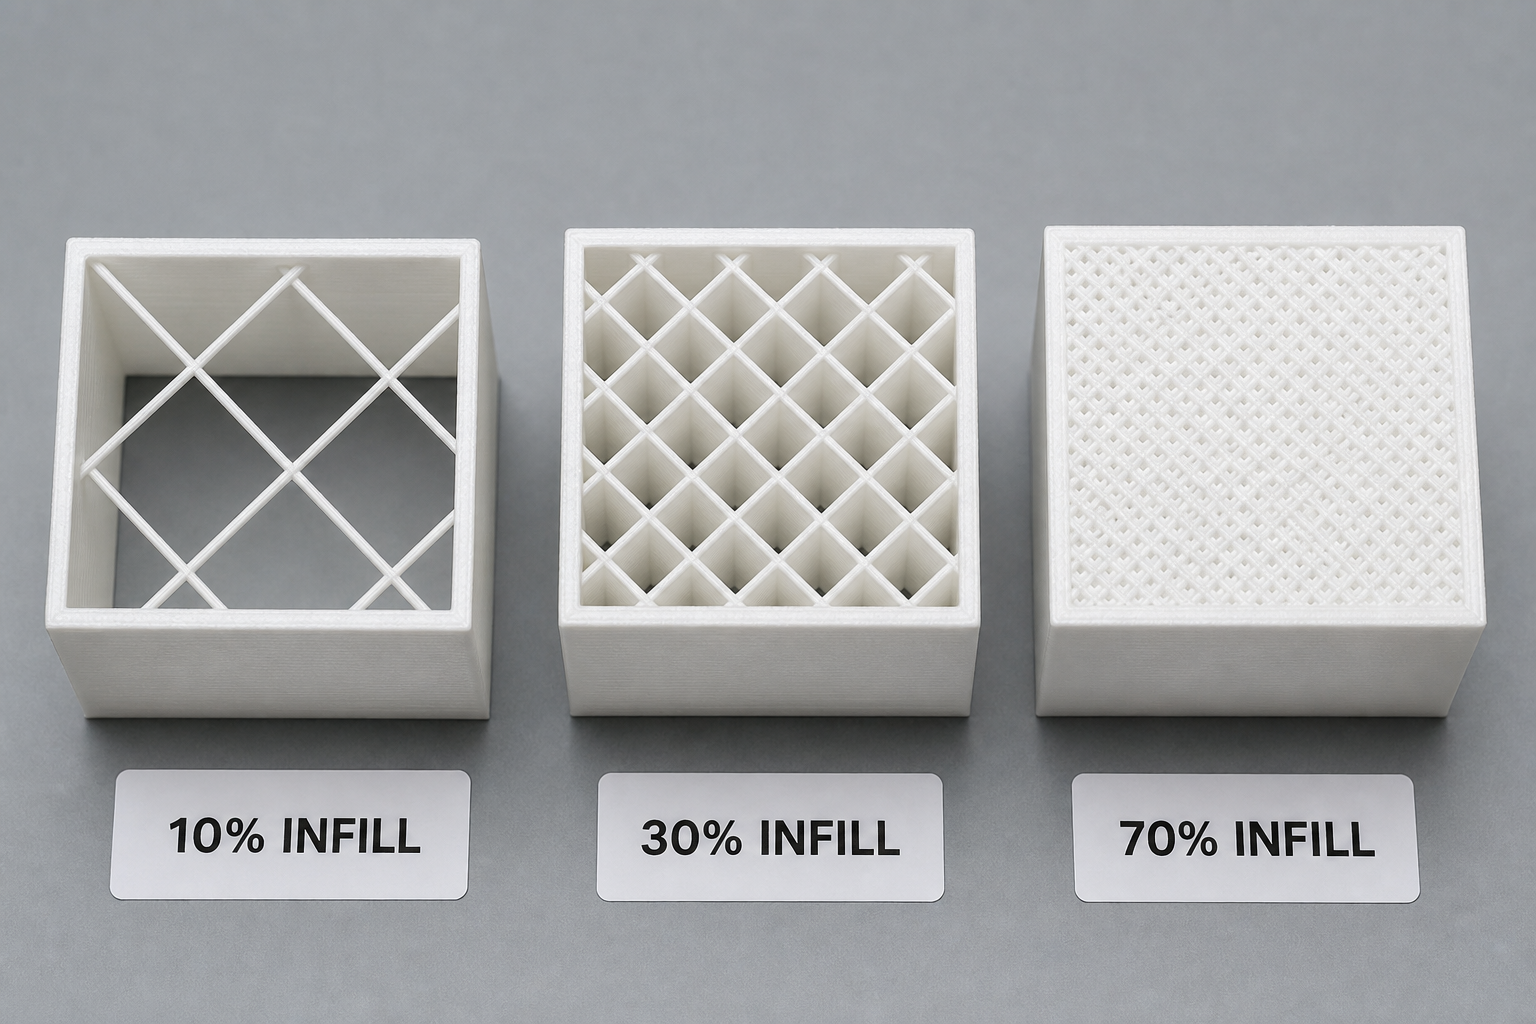
Infill density is the percentage of your print that is filled with plastic. At 0%, the inside is completely hollow. At 100%, it's completely solid. As that percentage increases, so do strength, weight, print time, and filament use. The catch is that strength doesn't increase forever. Once you get above 60-70%, the extra strength is surprisingly small, and the print time and material use keep going up. Most prints don't need that trade-off.
Quick reference by project:
| You're printing... | Density | Pattern | Why |
|---|---|---|---|
| A vase, figurine, or decoration | 10–15% | Lines | Just enough to hold the shape, fast and economical |
| A phone stand, organizer, or prototype | 20% | Grid | A good balance of strength and speed |
| A tool handle, bracket, or mount | 30–50% | Gyroid | Strong in multiple directions |
| Something that needs maximum strength | 50–70% + 4 walls | Gyroid or Cubic | Above 70%, adding walls is usually more effective |
Here's what those density ranges look like in practice.
0–15%: This range is best for decorative prints that won't be under any real load. 10% infill is perfectly fine for display models, figures, and such prints where strength is not a concern.This saves you both time and filament, but be sure to have 5-6 top layers or the top surface will sag.
15-30%: This is the sweet spot for most prints. If you are not sure where to start, 20% is a safe bet, giving a good balance between strength, print time, and material usage. It’s good enough for organizers, phone stands, prototypes, and so many other everyday parts.
30-50%: This should be your goal for functional parts that are going to be handled regularly or carry moderate loads. If you’ve been wondering if 30% infill is too much, it isn’t. It’s a practical choice for brackets, tool holders, mounts, and other parts needing extra strength without being unnecessarily heavy.
50-100%: Use this one for parts that must withstand huge mechanical strain. Even then, it rarely makes sense to push all the way to 100%. Above 60-70%, you will continue to increase print time and filament usage, but the strength gains become much smaller. Adding more walls is many times a better way to make a part stronger.
Infill Density by Material
The ideal infill density also depends on the filament you are using. Some materials are naturally stiff, while others require more internal support to be equally stiff.
| Material | Recommended Density | Notes |
|---|---|---|
| PLA | 15–25% | Easy to print and rarely needs high density for everyday parts |
| ABS | 25–40% | Shrinks more during cooling, so a slightly higher density helps maintain rigidity |
| PETG | 20–30% | Naturally tough and slightly flexible, making mid-range densities a good fit |
| Nylon | 30–50% | Flexible by nature, so it benefits from more internal support |
| TPU | 10–20% | High densities reduce flexibility, defeating one of TPU's biggest advantages |
3D Printing Infill Patterns Explained
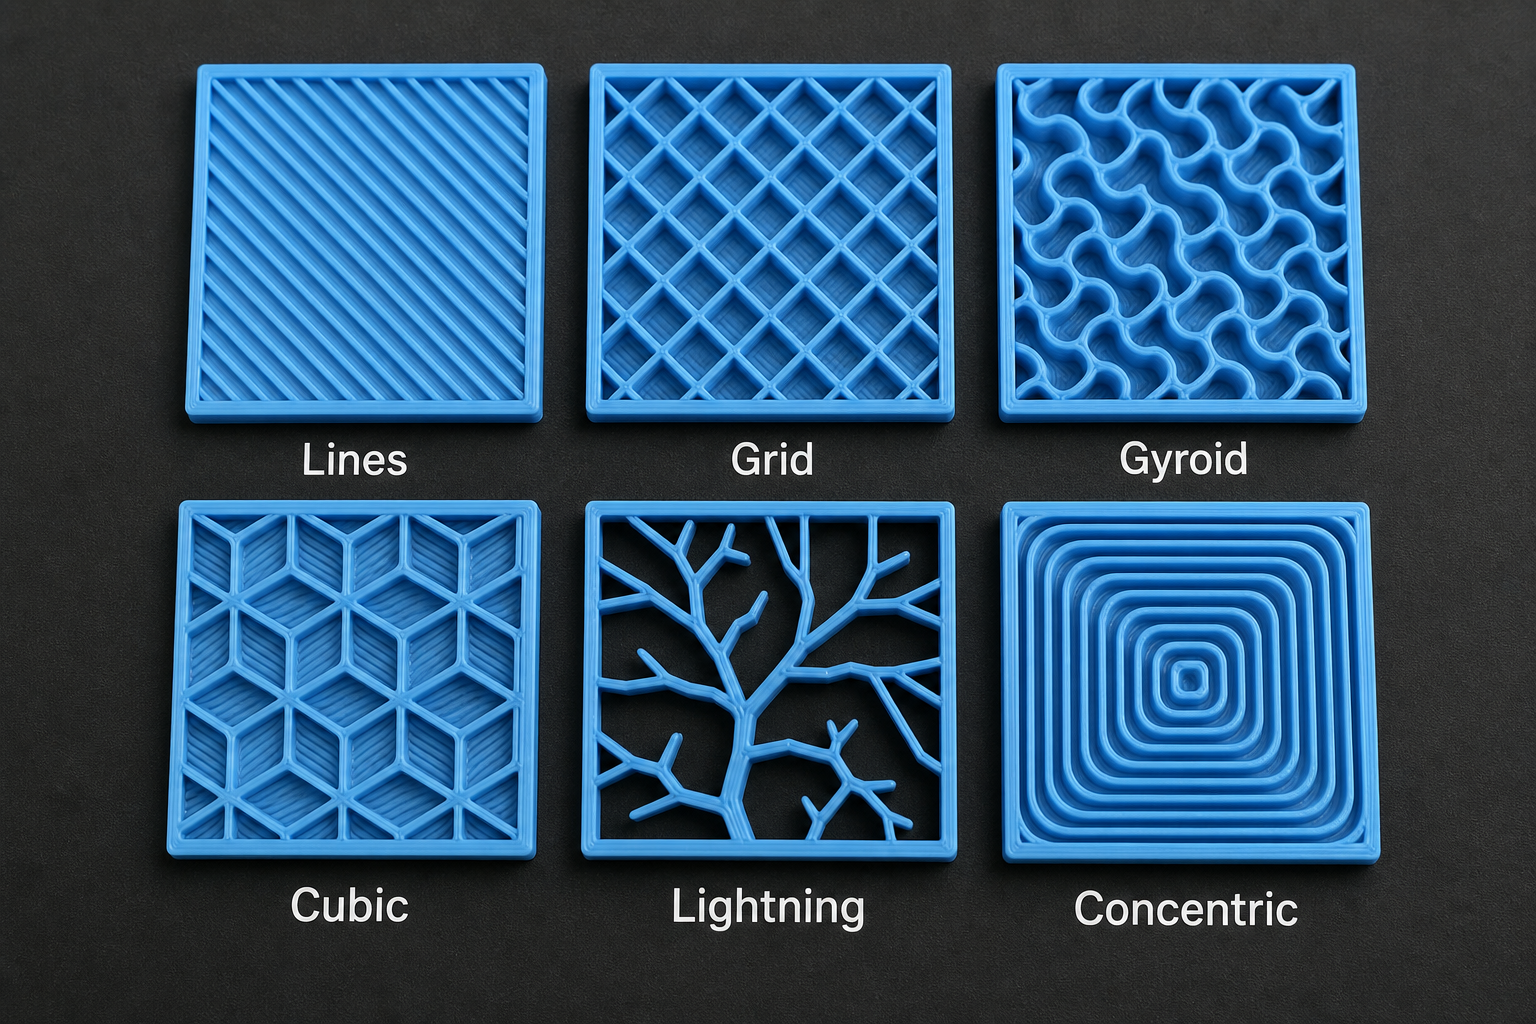
The infill pattern is simply the geometric shape of that internal structure, and it matters just as much as density does. The infill pattern decides how that material is arranged. Two prints with the same 20% density can behave very differently simply because they're using different patterns.
Most slicers include a long list of infill patterns, but you don't need to learn all of them. For beginners, six patterns cover almost every situation you'll run into.
| Pattern | Strength | Speed | Material Use | Best For |
|---|---|---|---|---|
| Lines (Rectilinear) | Low | Fastest | Lowest | Display models, quick prototypes |
| Grid | Medium | Fast | Low–Medium | General-purpose prints |
| Gyroid | High | Medium | Medium | Functional parts, flexible materials |
| Cubic | High | Medium | Medium | Mechanical parts, load-bearing prints |
| Lightning | Very Low | Very Fast | Very Low | Decorative models, rapid prototypes |
| Concentric | Low–Medium | Fast | Low | TPU, phone cases, flexible parts |
Lines (Rectilinear)
It’s the most basic pattern you’ll find: simply straight parallel lines in each layer, changing direction as the print rises. It's also the fastest choice and the lightest on filament, making it a natural fit for figurines, decorative prints, or quick test prints where strength was never really the goal. But don't expect it to hold up under any real weight.
Grid
Grid crosses two sets of lines at 90 degrees. It forms a lattice, where the force is spread in two directions per layer instead of one. That’s what makes it considerably stronger than lines, and honestly, it’s the pattern most people should default to when they’re unsure what to pick. It prints general-purpose prototypes and everyday household items with little fuss.
Gyroid
A gyroid resembles ocean waves frozen in mid-motion, not straight lines but a wavy, continuous 3D surface. Its uniqueness comes from the fact that it is isotropic, i.e., it works equally well in all directions (X, Y, and Z), whereas most other patterns work well only in one or two directions. Also, it prints quietly because there are no sharp turns for the nozzle to contend with due to the curved paths. It's a little slower than Grid, but for functional parts or anything that is subject to unpredictable forces, that tradeoff is worth it.
Cubic
Cubic builds a 3D grid of tilted cubes, stacked at an angle through the model. Like Gyroid, it is isotropic, but it tends to produce a stiffer, more rigid result, making it the better choice for mechanical parts, jigs, fixtures, or anything that needs to resist compression rather than flex.
Lightning
Lightning builds a tree-branch structure that creates material only where it is really needed to support the top surface, leaving the rest alone. That makes it by far the lightest and fastest pattern, but also means that there is almost nothing to support the part structurally. Use it for fast prototypes or showpieces where speed is more important than strength.
Concentric
Concentric follows the outline of the outer walls, repeating inward like the rings inside a tree trunk. That form gives the part flexibility. It lets it bend instead of breaking out straight. That’s exactly why it’s so good for TPU prints, phone cases, and wearables—anything that needs to flex rather than be rigid.
If you’re using Creality Print instead of one of the slicers above, the core patterns are the same, with the same names like grid, gyroid, cubic, lines, and so on—so everything here applies.
3D Printing Infill for Strength: Why More Infill Isn't Always the Answer
When a print fails, most beginners will first reach for the infill setting. It seems logical, that more plastic on the inside would make the part stronger. Sometimes it does, but not as much as people think. The biggest gains typically come from choosing the right pattern and making the print's outer walls thicker.
Best Infill Pattern for Strength
If strength is your priority, Gyroid and Cubic are the two patterns worth focusing on.
- Gyroid is the most versatile. It has a continuous 3D structure that distributes force across the part equally, so it is good when pressure is likely to come from different directions. This makes it a popular choice for brackets, tool holders, and other functional prints.
- Cubic is strong in all directions, but it makes a stiffer inner structure. If the part should be as rigid as possible or mostly compression resistant, then Cubic is often the better choice.
Some slicers also have patterns such as triangles and tri-hexagons. They are also powerful, but mainly in specific directions, making them less versatile for general-purpose printing.
The 40-50% Gyroid is a great combo for most beginners where strength matters.
Infill vs. Wall Count: The Setting Beginners Overlook
Many new makers are surprised to find that increasing wall count actually strengthens a print more than increasing infill.
That’s because the outer walls carry most of the weight. They resist bending, absorb impact, and keep the part together. The infill is mainly supporting those walls from the inside.
Imagine two versions of the same bracket. The first has 2 walls and 60% infill — the brute-force approach. The second has 4 walls and only 30% Gyroid. The second print uses less plastic overall, yet it's often the stronger part because the thicker outer shell carries most of the load.
A common beginner mistake is printing at 100% infill in the hope of getting maximum strength. The result is usually a heavy print that takes far longer to finish and offers far less improvement than expected.
A better approach is simple:
- Increase the wall count to 3–4 first.
- If the part still isn’t strong enough, increase the density of the infill.
- Use 100% infill only in the rare cases where it is truly needed.
Strength Cheat Sheet
| Strength Level | Walls | Infill Pattern | Infill Density |
|---|---|---|---|
| Light duty (shelf organizer, cover) | 2 | Grid | 20% |
| Medium duty (phone mount, tool holder) | 3 | Gyroid | 30–40% |
| Heavy duty (bracket, jig, clamp) | 4+ | Gyroid or Cubic | 50–70% |
| Maximum (load-bearing, mechanical) | 4+ | Gyroid | 70% or more (consider a stronger material) |
How to Set 3D Print Infill in Your Slicer
Once you’ve selected an infill density and pattern, the only thing left to do is to tell your slicer to use them. Each slicer arranges its menus a little differently, but you can find the settings easily once you know where to look.
How to Set Infill in Bambu Studio & Orca Slicer
Bambu Studio and Orca Slicer have the same layout and thus the same steps.
- Select your model on the build plate.
- In the left panel, click the Quality tab (the second tab).
- Scroll down to the Sparse Infill section.
- Set Sparse infill density to your preferred value (e.g. 20%).
- Set Sparse infill pattern to Grid, Gyroid, or Cubic.
Orca Slicer is based on Bambu Studio, so once you get used to one, you’ll feel right at home in the other.
How to Set Infill in PrusaSlicer
PrusaSlicer keeps all infill settings together under the Print Settings menu.
- Open the Print Settings tab.
- Choose the Infill section.
- Set Fill Density to the desired percentage.
- Select a Fill Pattern from the drop-down list.
- Leave Infill/Perimeters Overlap at the default 25% unless you know why you would change it.
How to Set Infill in Cura
Cura places infill settings in the right-hand print settings panel.
- Select your model.
- Open the Infill section. If you don't see it, type "infill" into the settings search bar.
- Set Infill Density to your chosen percentage.
- Select an Infill Pattern, such as Grid, Gyroid, or Cubic.
If you use Creality Print, you'll find almost the same settings with similar names, so the process is nearly identical.
Common 3D Print Infill Problems and How to Fix Them
Even with the right settings, infill problems can show up from time to time. Most are easy to diagnose once you know what causes them.
| Problem | What You See | Likely Cause | How to Fix It |
|---|---|---|---|
| Weak or stringy infill | Thin, wispy infill with gaps | Infill speed is too high or the nozzle is too cool | Reduce infill speed by 30–50% and verify the nozzle temperature matches your filament. |
| Infill not bonding to walls | Gaps between the infill and outer walls | Infill/wall overlap is too low | Increase the overlap to 15–25%. |
| Gaps or holes in the top surface | Sagging or pillowing on the top layers | Low infill or too few top layers | Use 5–6 top layers or increase infill above 15%. |
| Infill pattern visible on the outside | Grid or other patterns show through the surface | Too few walls or a thin outer shell | Increase the wall count from 2 to 3 or use a wider wall line width. |
| Problems with 100% infill | Warping, poor surface quality, or failed prints | Excessive heat buildup and internal stress | Reduce infill to 60–70% and increase the wall count instead. |
FAQs
What is 3D printing infill?
Infill is the internal structure printed inside the outer walls of a model. It supports the shell and affects four key things: strength, weight, print time, and filament use. You control it with two slicer settings: infill density, which determines how much material is inside the print, and infill pattern, which determines how that material is arranged.
Is 10% infill okay?
Yes. 10% infill is a good choice for decorative prints like figurines, vases, and display models where strength isn't important. Just make sure you use 5–6 top layers so the top surface has enough support.
Is 30% infill too much?
Not at all. 30% infill is a practical choice for functional parts such as brackets, phone mounts, tool holders, and organizers. It provides noticeably more strength than 20% without dramatically increasing print time.
Is 5% infill too little?
For decorative prints, 5% infill can be enough if you use extra top layers. For anything that will be handled regularly or support weight, it's too low. In those cases, start around 15–20% instead.
Comments ()